3 Easy Ways to Bring Chip and Jo’s Favorite Accent Home
We're talking all things shiplap.
Updated Jun 25, 2019 6:38 PM
We may earn revenue from the products available on this page and participate in affiliate programs.
Thanks to the emergence of the modern farmhouse aesthetic—and the good graces of Chip and Joanna Gaines—our vocabulary has grown to encompass a slew of buzzy design words that embody the fixer-upper movement. The term leading the way for all things shabby-chic? Shiplap.
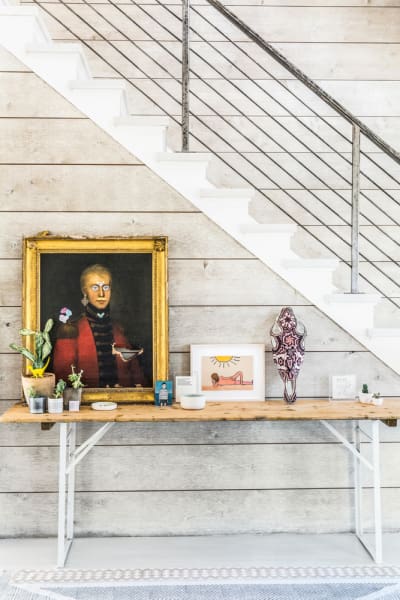
Whether left raw and whitewashed or polished in a matte black, you don’t have to be an HGTV aficionado to know that this paneling has taken the design world by storm. That said, “shiplap” is often used as a casual descriptor for anything that even slightly resembles the boarded paneling.
Originally designed to withstand extreme weather conditions, shiplap has long been used in the construction of barns, sheds, and similar rustic spaces. Only recently, has it become popular to use the paneling in the interior of a home. Given its weather-resistant strength, the first key identifier is the overlapping grooves, or rabbets, at the bottom and top of each board, which allow the pieces to fit snugly together.
Despite its stunning ability to wow as an all-over look, this farmhouse staple isn’t as affordable as you’d think. That’s where DIY comes in. Whether you’re looking to install a genuine shiplap wall or simply recreate the look with a little paint, there are myriad ways to bring this staple home—no contractor required. Ahead, a handful of seasoned experts share their tricks and tips for pulling off shiplap on your own.
Installing Real Shiplap 101
Covering the basics of install, Mike Sutkus, merchant at The Home Depot, shares his general guidelines for installing a shiplap wall at home. From the supplies you’ll need to mistakes to avoid, here are his go-to tips:
Materials and Tools
- Nail gun
- Mitre saw
- Jigsaw
- Ladder
- Outlet extender
- Shiplap boards
- Level
- Paint and primer
Preparation
The size of your planks will vary according to the height and length of your wall. Generally, Sutkus suggests installing boards that are 5.25” wide. Standard lengths for boards typically include 8’, 12’, and 16’. “If possible, buy a length that covers the entire width of the wall,” he says. “So if the wall is 14’, buy 16’ length. That way you’ll have a clean finish.”
While most renovators tend to put off the priming and painting until after the wall is set, Sutkus suggests it may be easier to paint your boards prior to installation. Not sure where to start when it comes to paint? Check out everything you need to know—from picking out finishes to prepping the room—here.
Installation
- Remove outlet covers and anything else hanging on the wall.
- Measure the wall and mark the studs. You’ll want to nail every other 1” up from the bottom of the board.
- Hold your first board in place by hand and make sure the piece is level. You can start from the bottom-up or top-down. Nail the shiplap to the wall into the studs. Always end the piece at a stud.
- As you begin to add the next board, use a scrap piece of wood to push the grooves together.
- For the following row, create a staggered pattern by using the remaining piece of your last plank as your starting point. Use the jigsaw to cut around any outlets.
- For the corner molding, you can fill in the gap with a transition piece to butt up to the molding or put the molding over the existing shiplap.
Stikwood
For the amateur DIY-er who wants the look and feel of shiplap without all the work, there’s Stikwood: The world’s first peel-and-stick reclaimed wood planking. The best part? You don’t need any construction or woodworking experience to install Stikwood.
“The idea behind Stikwood was to bring the richness of beautiful, authentic reclaimed wood into the home in a convenient way,” shares co-founder, Jerry McCall. “I wanted to provide an alternative to pricey contractor installed reclaimed wood walls and conventional DIY materials like vinyl, MDF, laminate, and other wood imitations.”
What is it?
Stikwood comes in the form of thin peel-and-stick panels crafted from real wood using the company’s thin plank technology. The wood for the planks are largely sourced from structures around the country, and thus boast many of the natural, weathered characteristics you’ll find on a whole wood plank.
What is the install like?
Generally, McCall suggests that a 100-square-foot wall should only take a few hours to complete. “You’ll want to clean the wall prior to installation, then it really is as easy as peeling, sticking, and pressing the planks in place,” he says. “The thin nature of our wood panels removes the need to adjust door jambs or molding, and the varied lengths ensure that the need to cut wood is kept to a minimum.”
Before you install, you’ll want to let your wood acclimate for approximately 48-72 hours. Once your planks are ready, remove the adhesive strips off the back of the plank and place them on a leveled reference line. Continue like this, plank by plank, until you’ve covered the desired space. Use scraps or short boards from previous cuts to fill in any leftover gaps.
How can I get the shiplap look?
While Stikwood sells a number of inspired woods, Hamptons, one of the company’s best sellers, most closely resembles shiplap. Whether introduced in smaller doses or across a larger scale, the rippled and grainy texture of the reclaimed planks will extend a coastal, cozy vibe to any space.
“One of the coolest projects we’ve seen someone do was a reading nook with a cathedral ceiling. They used our Reclaimed Weathered Wood to differentiate the carved out nook from the rest of the playroom, and it was amazing to see the difference a small amount of Stikwood made in the space,” shares McCall.
Paint
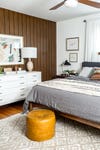
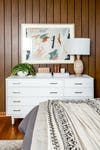
Another fresh way to fake shiplap is to paint it! Yes, really. Just take it from Carrie Waller—blogger behind Dream Green DIY and owner of this magical 1960s inspired Virginia home. In lieu of installing real (or Stikwood) planks in the bedroom, with a little masking tape and a few coats of paint, Waller DIY’d her way to the perfect shiplap masterpiece. Like most of us, the idea of woodworking, taking precise measurements, and wrestling with power tools, wasn’t the most appealing idea.
“Paint, though? That, I could handle,” shares Waller. “It’s one of those wild projects that probably shouldn’t have worked, but somehow did—and we love it. I’m even thinking of trying the same technique to get the look of white beadboard paneling in another room of our house!”
Here’s a deeper look into her faux mid-century DIY:
Materials and Supplies
- Top-of-the-line masking tape*
- Primer
- Paint
- Ladder
- Brushes
*“Cheap tape could allow for paint to seep under the edges, which will be a dead giveaway that your wall isn’t the real deal once all is said and done,” says Waller.
Make sure your tape is solid.
“The most challenging thing about the project was making measurements for the masking tape. Our home was built in the ’60s, so most of the walls are a little uneven. In order to get straight seam lines, you need to mark the wall twice at exact increments: once at the top of the wall, and once at the bottom. Then you connect those two measurements by running masking tape between them from floor to ceiling.
The first time I measured, marked, and ran those lines of tape, they looked pretty slanted because our walls just weren’t straight. Eventually, I realized that I needed to start with one level line (this time using a real level rather than making do with the edge of the wall) to run my measurements from,” explains Waller.
Create the grain by using two shades.
“The good think about this project, in terms of choosing your colors, is that real wood runs the gamete in terms of tones. As long as you choose a wood-like brown, you’re pretty much good to go. The key is to choose two different shades of brown to get that wood-like layered look. If you’re unsure, my suggestion is to take a piece of wood with you to the paint counter and then hold up brown paint swatches until you find one that looks similar.
Then, to choose your second tone, just go with one shade lighter or darker right from the paint swatch. I promise this technique is forgiving! Take the guesswork out of the equation by using two complementary brown tones from the same swatch at the paint counter.”
Don’t overthink the brushwork.
“As I explain in the original tutorial on my site, I was able to get the look of wood grain by swiping a brush sideways up and down over the first dried layer of brown paint. I remember trying to copy the grain of a wood dresser we had nearby in our room, but then I sort of got in the zone and just made random swipes with the brush. Those unplanned sections where I just let my wrist move in freeform gestures are probably the most successful parts of the wall treatment.”
For her two brown tones, Waller used “Yule Log” and “Ancient Spice” (both by KILZ). “They’re very similar without being exactly the same, which helped mask any areas that got a little too uniform. The thing to keep in mind is that real wood paneling isn’t perfect, so your paint job doesn’t need to be either,” adds the blogger.
See more DIY ideas we’re loving:
Easy and Inexpensive Last Minute DIY Costume Ideas
Designers Share Their All-Time Favorite Ikea Hacks
1 Item, 3 Ways: Boundless Uses For Your Basic Basket
Isn’t it time you got the news you actually want? Sign up for your daily Domino email here.


