We may earn revenue from the products available on this page and participate in affiliate programs.

Who says you have to completely demo your kitchen (not to mention, your budget) to make it yours? In our new series, The No-Reno Kitchen, we’re highlighting total transformations that prove the power of paint, fixtures, and a little elbow grease.
Size: 69 square feet
Location: Galveston, Texas
Budget: $2,500
Top priority: Quick fixes that pack an aesthetic punch.
When Brooklynite Hannah Armitage and her husband, Daniel, of Soleil House decided to purchase a fourplex all the way down in Galveston, Texas, they never imagined that in only a few months’ time they would be living there themselves. (They had planned to rent it to vacationers.) But with jobs (she’s the founder of Simka Rose; he’s the director of operations for Unis), city life, and, well, everything in flux due to the pandemic, the couple decided to take a leap of faith. They packed up their apartment and moved south to throw themselves into renovating full-time. “We knew there was a good chance that this property would become our main source of income,” says Hannah, “so as soon as the shelter-in-place order went out in New York City, we were like, ‘Let’s go.’”
Hannah grew up vacationing in Galveston, so she knew that the town’s proximity to Houston would attract city dwellers looking for an escape. But as is, the property itself wasn’t such a sure thing. The kitchen desperately needed a revamp in the form of bold cabinets, updated hardware, and elevated lighting, and the Armitages were up to taking on the challenge themselves. “We wanted to do everything we possibly could to make the space nice for guests, but we couldn’t afford a complete gut reno,” says Daniel. “Not to mention we don’t have the skills for that kind of undertaking, which we learned the hard way.” It wasn’t until they tackled the cabinets that they realized just how much learning was in store. Here, the pair walks us through the many mistakes (and eventual successes!).
Save: Making Sacrifices


Daniel: The question we kept asking ourselves was: How can we make this space as nice as possible as quickly as possible? We started renovating before making a dollar, so we had to focus on small fixes until income came in. It all boiled down to deciding which changes would pack the biggest punch.
Hannah: We originally wanted to redo the flooring to be entirely hardwood, but these units are old—there are more than six layers of laminate and tile that have built up over the years. We only had the budget to tackle either the cabinets or the flooring, and the cupboards take up much more visual real estate, so it was important to do those first. We purchased a kitchen rug for $50 from Wayfair to cover as much of the less-than-desirable floor tile as we could.
Splurge: Painting, Then Repainting


Hannah: We tried to save time and cost by skipping all the prep steps, which ended up being our biggest mistake. We spent $108 on Sublime paint from Clare (a nod to the ocean) and covered all of the cabinets, before noticing that it wasn’t drying properly. We discovered that the original paint was oil based, which is great for wiping down cabinets but not for painting over them. We had to start from scratch.
Daniel: We peeled off as much of it as we could before eventually turning to our trusty sander to handle the rest. We took the cabinets off their hinges, sanded them down, and then added a layer of well-mixed primer. Because we live in such a humid environment, we decided to add a top layer of sealer after we repainted, which we highly recommend for any kitchen cabinet project. It has made for fewer nicks and scratches.
Splurge: Investing in New Appliances

Daniel: Instead of keeping the original stove, which was gas-burning, we ended up switching to an electric stove from Home Depot for $750. The old gas pipes stuck out from the wall, so it required the stove to sit pretty far out, which was an eyesore. Going electric allowed us to push the appliance back against the wall, which looked better and saved space.
Save: Compromising on Finish

Hannah: We were looking for a matching pendant light and a smallish drop chandelier, but it’s hard to find identical fixtures in different sizes that won’t break the bank. We ended up with two pieces from AllModern—the fixture above the sink was $66 and the larger chandelier-esque light was $163. The gold finish wasn’t exactly what I was hoping for—it’s a bit too olive green for my taste—but I was ultimately okay sacrificing color for similarity.
Splurge: Updating the Little (But Impactful) Moments

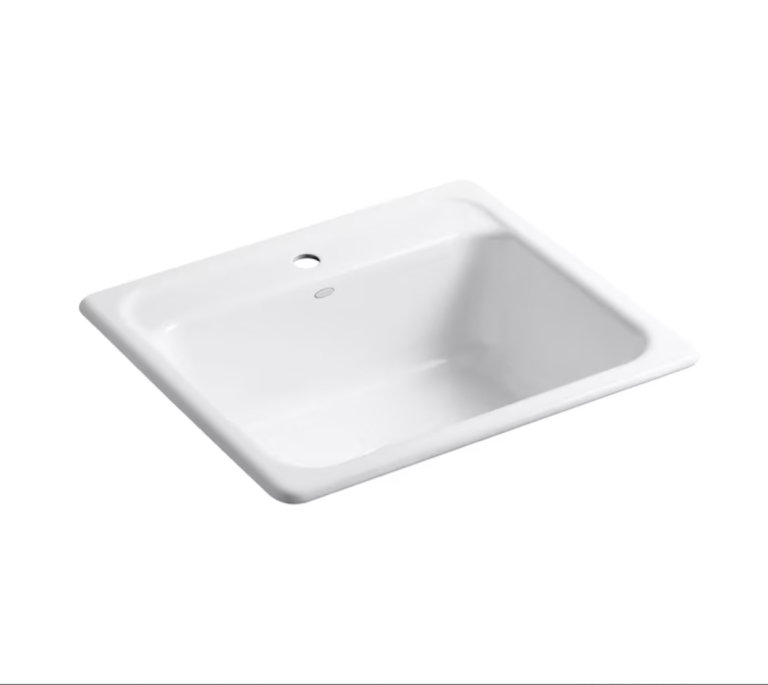
Hannah: We left the countertops and flooring as is for budget reasons, but we were able to redo the sink and the hardware. Like the cabinets, these are noticeable features that would make a big difference to the space’s overall aesthetic once updated. The original sink was stainless steel and the counters are a creamy white tile, which didn’t go together at all. We replaced the sink with a white farmhouse-style option from Lowe’s for $138, which complemented the tile nicely. We then chose a $137 brass faucet from Amazon for a bit of shine.
Get the Look


In Renovator’s Notebook, homeowners open up about the nitty-gritty of their remodels: How long it really took; how much it actually cost; what went horribly wrong; and what went wonderfully, serendipitously, it’s-all-worth-it-in-the-end right. For more tips to nail your next project, follow @reno_notebook.