We may earn revenue from the products available on this page and participate in affiliate programs.
Behind every beautiful “after” photo is a hard-won lesson (or three). In this summer’s series, “Gutted,” renovators share the biggest mistakes they made on a recent project, how they fixed ’em, and more wisdom they gained along the way.
Size: 225 square feet
Location: Dallas
Budget: $30,000
Top priority: Putting the DIY skills learned over the years to the test to create the kitchen of their dreams—within budget.
One thing Amanda and Michael Walker’s kitchen didn’t lack was space. At 225 square feet, there was plenty of room to roam—but that’s about it. The counter was nearly nonexistent, and the flow (or absence of it) left much to be desired. Amanda, an avid DIYer and content creator, had always known they’d need to renovate, but for the sake of their budget, she was determined to do it on her own.
She spent six years dreaming up the ideal layout and perfecting her skills in demoing, tiling, painting, and more to bring it to life. With all the features she wanted—a full wall of tile, a built-in breakfast banquette, room for a coffee bar, and an entire second side for a peninsula desk nook with open shelving—contracting the job would’ve cost a cool $16,850 in labor. Amanda, at 35 weeks pregnant, and Michael pulled it off for $30,000. “It challenged us far more than we imagined, but it feels so worth it,” she says. “We enjoy everything from cooking to crafts to homeschooling our kids to at-home date nights here, and we usually end up having all of our meals in the breakfast nook.”


Though she was no stranger to rolling up her sleeves for a home project, this was her first time renovating a kitchen. “Figuring out the dimensions and how the flow would work felt like a guessing game,” she says. The demo was some of the hardest work. The floor tile removal also took a lot of trial and error. Though she learned her biggest lesson when she rushed into the breakfast nook arch. “It was my fourth arch to DIY in our home, but the width of the window threw me off,” she says. “While it was drying, a couple of minutes from midnight, I tore it all down. I’m so happy I did, because the second arch frames the area so beautifully.” There were a few other times when they almost gave up, but pushing through paid off for the family of five. In these key moments, Amanda tells us how she pulled off her now-perfect kitchen right on budget.
Save: Go for Builder Grade

Because I was adding more cabinets, I wanted to make sure we stayed within budget. The builder-grade ones I chose only totaled $2,440, and I bought soft-close hinges to give them a high-quality feel before priming and painting them a soothing green: Biking Trail by Behr. I initially thought I’d get new doors for them down the road, but once I finished, I decided the style fits well within the whole design. A big bonus was that the builder-grade design still had trash drawers, so I installed two under the coffee nook for trash and recycling.
Splurge: Leave the Lumber to the Yard

There’s essentially one continuous shelf around the side we added, so I wanted it to stand out. After a lot of research, we decided to find a local lumberyard to build them. I could’ve probably figured out how to make a pretty shelf, but nothing really stood up to the ash (a hardwood that stains beautifully) we found through the pros. Plus the time and work saved by having the lumberyard glue and plane the pieces to perfection was such a bonus. The shelves cost $501, and then I installed them on Cascade iron brackets for $136. I’m sure I could have saved more money on them, but the quality—and being able to hand over the hard part of the project at 35 weeks pregnant—made it worth every penny.
Save: Keep the Stone Simple

There was a huge price difference between the quartz with veining I had my eye on and a simple white. I went back and forth about the decision, but I ended up choosing the Arctic White, which was $3,161 (about $3,000 less than the option I liked with veining). I did, however, go with a marbled quartz for the island, which gives a perfect contrast to the solid counters.
Splurge: Invest in Solid Seating

It may seem silly that one stool was a splurge, but this desk nook is extremely special. I couldn’t find any tutorials on how to build one, and I had to figure out how to work around the AC intake vent. It worked out far better than I thought, and between all the people in our home, this cozy niche is used almost all day long. Outfitting it with a gorgeous and comfortable stool was important to me, so I spent $698 on Anthropologie’s Raleigh counter stool in sandstone, and I’m so glad I did.
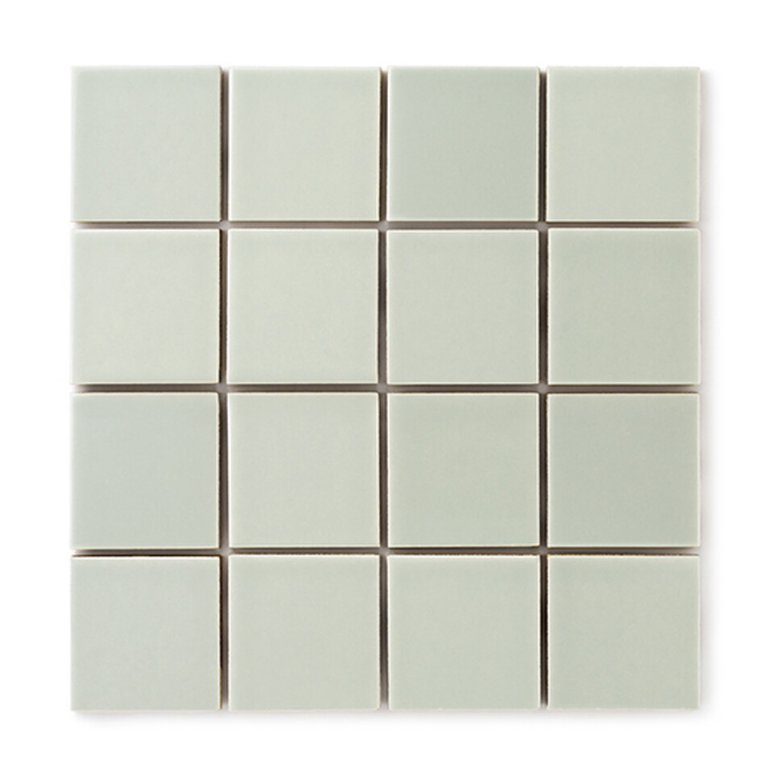
Save: Practice Makes the Perfect Backsplash

I learned how to tile for the first time on our covered porch. It felt low stakes, because it’s basically outdoors. Then I tiled a thin brick wall in our bedroom. All of that was amazing prep for DIYing the kitchen backsplash. It was a challenge to figure out how everything would line up around the room, especially in the corners. It didn’t make it easier that I was installing them while pregnant. The tile is the Manzanita Gloss 3×3 gifted by Fireclay Tile, and it was surprisingly easy to make a mosaic. After I finished the first wall, I grouted it as soon as possible to make sure I wasn’t making any big mistakes not having it done by professionals—I cried when I saw how good it looked when I was finished.
Now the kitchen really is the heart of our home. It’s been so much fun entertaining friends and seeing how the flow works for talking around the island. It’s such a soothing space, yet it allows for vibrant life to be lived within it.
Get the Look