We may earn revenue from the products available on this page and participate in affiliate programs.
Who says you have to completely demo your kitchen (not to mention your budget) to make it yours? In our new series, The No-Reno Kitchen, we’re highlighting total transformations that prove the power of paint, fixtures, and a little elbow grease.
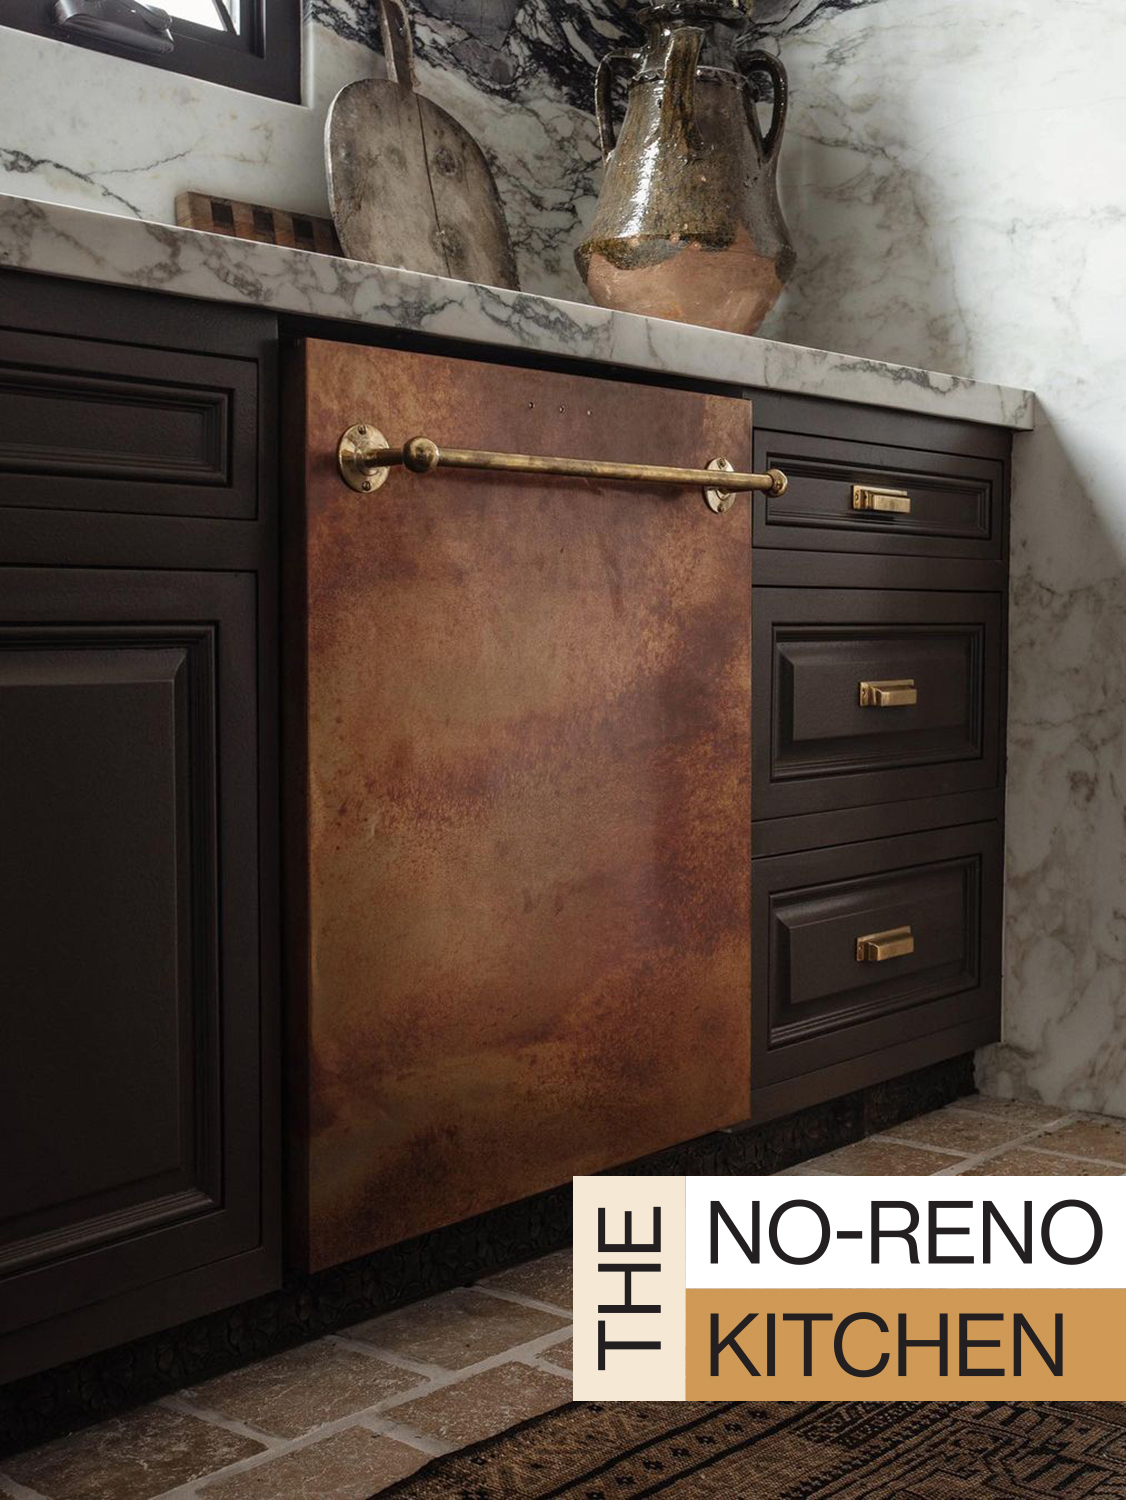
Drew Michael Scott knows he’s not supposed to put his copper pots and pans in the dishwasher, but that didn’t stop him from covering the appliance itself in the metal. For his latest kitchen upgrade, the serial DIYer and creator behind Lone Fox wrapped his 24-inch-wide stainless steel Samsung dishwasher in a solid sheet of copper that not only looks great alongside his dark brown cabinets but matches said cookware collection. “I started the process with hope, just trusting myself,” says Scott. The risk factor was especially high on this project: He’d only get one go at it. “I was like, okay, if I just take the door off and wrap it like a present, I feel like it would work,” he remembers.
The 3-by-4-foot copper sheet, which he sourced through Van Dyke’s Restorers, totaled to $446 with shipping. But Scott says the splurge was worth it for this transformation. “I definitely thought about contact paper and spray paint, but I knew they’d look very mediocre,” he says. “I really wanted that authentic metal look.” Scott documented the project in a recent YouTube tutorial, but you can also catch his step-by-step, below. Plus he tells us how it’s holding up one month later.
The Supplies
- Screwdriver
- Solid copper sheet
- Two tubes of steel reinforced epoxy
- Pencil
- Scissors
- Clamps
- Metal scraper
- Wooden spoon
- Optional: Copper pot rack bar to use as handle
- Drill
- Screws
- Pliers
- Wing nuts
Step 1: Remove the Panel


Turn off your dishwasher and open it up. You should be able to remove the front panel by unscrewing it from the inside of the machine’s door. After some brief wiggling around and shifting wires out of the way, the front should pop right off. Set the hardware aside. Next, unscrew the existing handle.
Step 2: Account for Any Lights
In Scott’s case, his dishwasher had three tiny holes on the front for the “on” lights. If you also need to account for buttons or lighting, lay your dishwasher panel on a flat surface and place a sheet of painter’s paper on top of it. Cut the paper to match the door’s dimensions, accounting for all four sides as well as the front. Then, with a pencil, lightly scribble over any holes so the markings transfer to the paper. Use a hole puncher to make the markings even more clear. This is your template.
Step 3: Trim It Down
Lay the paper on top of your copper sheet, securing it with blue tape. Trim off the large amounts of excess metal with scissors (Scott allowed for approximately an inch of extra sheeting on all four sides). Pulling out your hole puncher again, create the openings for the lights in the copper sheeting.
Step 4: Fuse the Old and New


With your dishwasher panel laying flat on a table, face up, begin to apply a thin coat of epoxy across its surface. Warning: You’ll have to work fast, as the adhesive’s drying time is only six minutes. A metal scraper will allow you to spread the glue quickly and evenly.
Gently set your copper sheet on top of the door, using the holes for the lights as your guide for perfect alignment. Leave it to cure, plopping a few coffee-table books on top of the copper sheet to help the process along. Scott waited around an hour and a half, but the product’s directions suggest up to six hours of setting time.
Step 5: Wrap the Edges Like a Present


Lightly fold the overhanging metal around the edges of the dishwasher panel with your hands. For tidy corners, make a small slice with your scissors and then use jewelry pliers to neatly fold and press the sheeting. Then cut off the excess material, leaving only ¼ inch of copper sheeting around the border (the rest will be hidden by your cabinets). You want to get it as tightly wrapped as possible, so continue to crease the edges with a wooden spoon, as it won’t mark up the surface. Where needed, apply extra epoxy or use books, clamps, painter’s tape, or screws to help fully seal the metal to the sides.
Step 5: Get a New Grip on Things

Scott decided to swap out the dishwasher’s handle, too. Well, technically, it’s a pot rack that turned out to be the perfect size. To do the same, flip over your finished panel and locate the holes where the old handle was mounted. Press lightly into the openings with pliers, just enough to leave a small dent on the front side. Flip the door back over and mark those indentations with a pencil before drilling through them. Scott used screws, wing nuts, and mounting plates to secure his new brass bar in place. Finally, grab the original appliance screws and reattach your brand-new panel.
And the Verdict Is…

Copper is an ever-changing material. As the metal reacts with carbon dioxide and water over time, the surface will turn a blue-green patina color—but that’ll take a really long time in this case, Scott points out. “If it turns green, I think that would be so cool, but this copper sheeting has a coating that would have to wear down before it actually starts to oxidize,” he says. And Scott’s not done with the material yet: He plans to use the extra scrap pieces to line open shelves and maybe even cover his base cabinet’s toe kicks.