We may earn revenue from the products available on this page and participate in affiliate programs.
For hands-on advice from designers and pro DIYers, plus more scrappy before-and-after transformations, subscribe to Reno. Let your in-box do all the hard work—for now.
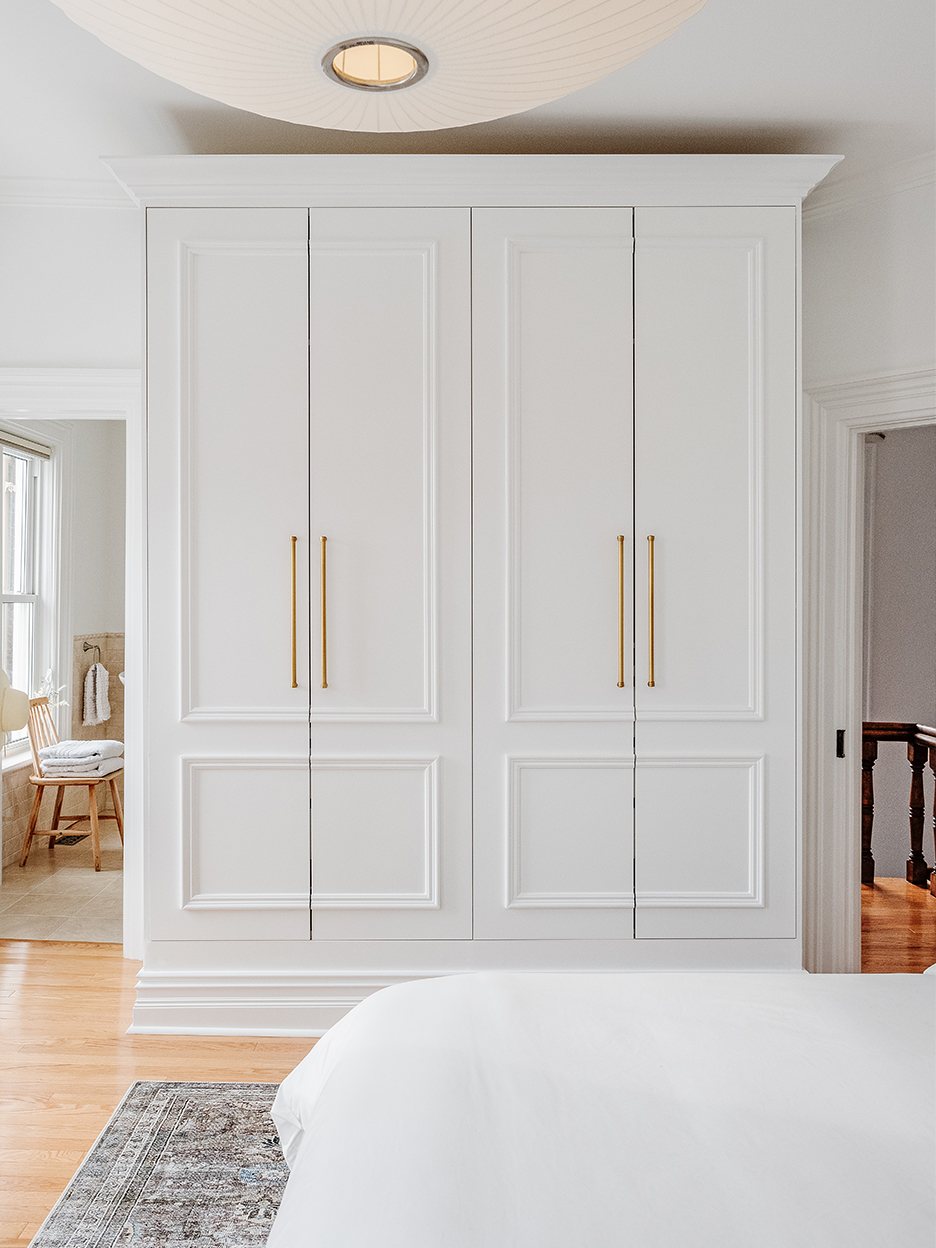
When newlyweds Sarah and Kevin Reid-Morris left Toronto and bought an 1880s Victorian house two hours outside the city in Prince Edward County, they lived out of cardboard garment boxes for nearly three months. “Our clothes were also spread throughout the house on multiple beds,” recalls Kevin. “It was pretty terrible.” It wasn’t all that unusual that their main bedroom lacked a closet (people just didn’t have as many belongings back then, so there wasn’t a need), but the couple couldn’t resort to moving bins forever. After hearing estimates of $10,000 to $12,000 for a custom storage solution, they turned to IKEA.
“It was actually my mom who told us about the Pax,” recalls Kevin, who was hesitant about going with the wardrobe system at first. Glossy modern cabinets in a historic space where ornate 14-inch baseboards and prominent crown molding are the real stars just didn’t make sense (in other words, they didn’t want to be those people who departed from what was period appropriate). “Our point of view has always been that we’re just caretakers of this home; we live in its history,” he says. “It’s kind of our job to protect the decisions that were made in the 1880s and ’90s and, if we can, enhance them to be better than the way we found them.” With the help of YouTube and their own ingenuity, they hacked the big white boxes to look like they belonged in the old home. (Psst: The magic is all in the trim). Read on for how they did it for a mere $1,600.
The Secret Weapon


While this may have been their first IKEA hack, Sarah and Kevin are used to having to get creative (he works at Ontario College of Art and Design University; she leads Doblin Canada, a design-led firm owned by Deloitte), and they both happen to be really skilled in PowerPoint. “It’s kind of our go-to tool,” says Kevin. They dropped images of their IKEA wardrobes (they bought two in the biggest sizes the company sells) into the platform and started drawing patterns where they thought they wanted to add trim—the thing that would ultimately make the closets look a bit more Victorian.
The exercise proved to be super-helpful, because they ended up steering clear of their original concept, which was to add detailing to each wardrobe’s four panels. “It was looking way too tall and skinny, like an awkward teenage wardrobe,” says Kevin with a laugh. They landed on a simpler version that called for two rows and two columns that span the doors. (You can see all the diagrams in a detailed blog post on their site, Readmore House.)
The Game-Changing Test


Another key step in nailing the proportions of the trim: applying blue painter’s tape to the doors. “It put it into context,” says Sarah. Again, they caught a mistake before it turned into a costly one: They were able to test out where the strips would sit in relation to the RH handles they purchased and realized the spot they thought would work best was actually too high.
The Inner Workings

One benefit of going with IKEA closets is that they’re still super-customizable. While ordering the parts from the Swedish retailer, Kevin and Sarah were able to pick and choose everything, down to how many drawers they would each have on their respective sides. Kevin’s area, for instance, was made to accommodate all his Patagonia sweatshirts and flannel button-downs. “All of my friends joke I have a uniform,” he notes. Sarah’s nook is outfitted with smaller compartments for accessories (jewelry, belts, scarves). “I wanted to be able to put a complete outfit on from this one space,” she explains.
The Molding Hack

Because they tackled this project mid-lockdown, the couple wasn’t able to go to the hardware store to browse molding—purchasing the pieces online was the only option. The issue was, Sarah and Kevin had no idea if the molding would turn out to be too chunky or slim for the doors without testing it out. “I had a collection of inspiration images on Pinterest, so what I did was measure the doors compared to their molding widths in pixels,” explains Kevin. Then he converted the scale to inches in real life. “I was hyper-paranoid about this,” he says, laughing.
The Extra Boost

In order to get the Pax systems nicely flush against the wall, they built a frame out of 2-by-4s to lift the boxes up off the ground so they were higher than the original baseboards. This also meant they could wrap new baseboards around the sides and the front of the closets to get that built-in look. On the sides, they added pieces of MDF, closing the opening between the cabinet and the wall and, on the top, the installed crown molding (Kevin secured it with an air compressor and brad nailer). Still, there were little gaps here and there, but they weren’t anything that a little caulk couldn’t fill.
The great news was the Pax sets were level with each other. The bad news? The floors weren’t. Redoing the boards wasn’t an option for their budget, so once they prioritized the straightness of the shelves and rods inside the cabinets, they decided to make the new baseboard slightly taller on one end to accommodate for the unevenness. It turned out to be the best compromise. “We were walking the dog one night and realized, Oh, my God, you can see our closet through the window outside,” says Kevin. As far as their neighbors think, their Pax is perfection.

Our Winter Renovation issue is here! Subscribe now to step inside Leanne Ford’s latest project—her own historic Pennsylvania home. Plus discover our new rules of reno.