We may earn revenue from the products available on this page and participate in affiliate programs.
When Jennifer Acito and her husband purchased their Ridgewood, New Jersey, home in 2016, it had only ever belonged to one other family. The great-grandson of the couple who built the house in 1923 happened to be living there and gave Acito some pointers during the initial walk-through, including mention of an original screen door. “At the time we thought it was old-fashioned, so we just forgot about it,” says Acito. It wasn’t until this summer, as she was having her main front door stripped and painted, that she finally went hunting for its companion and found it hiding out in their detached garage. “This thing was awesome,” she recalls. “You don’t see this kind of craftsmanship today.”
The wood frame was in rough condition (even Acito’s painter was too scared to touch the fragile piece). “I just remember him saying, ‘This is a lot of work,’” she says. His advice? Have someone replicate it with all new parts. But Acito didn’t want to lose the soul, so she dedicated four weekends to salvaging the piece, all for just $99 (the expense, in this case, was her time). “I said, I’ll restore that door if it’s the last thing I do.”
Step 1: The Stripping


After removing the old screens from the openings, Acito laid the heavy frame on a table on her back patio. In order to remove the seven layers of old paint that had been applied over the decades, she coated the surface on both sides with a paint and varnish stripper and then covered it with Saran Wrap so the treatment would be absorbed by the wood. She left it to soak for an hour before chipping away at the layers with a scraper. “It bubbles up and just starts removing itself,” she says.
Step 2: The Priming

While not as labor-intensive as the first part, the priming was surprisingly the most time-consuming step. Acito ended up having to apply three coats of an exterior latex wood primer from Sherwin-Williams to the back and front in order to hide all the brown spots she couldn’t scrape off. Key to this process: She waited a full 24 hours in between each covering so they could properly cure and dry. “If you put the next coat on too soon, that’s when you start getting weird streaks,” she says.
Step 3: The Painting

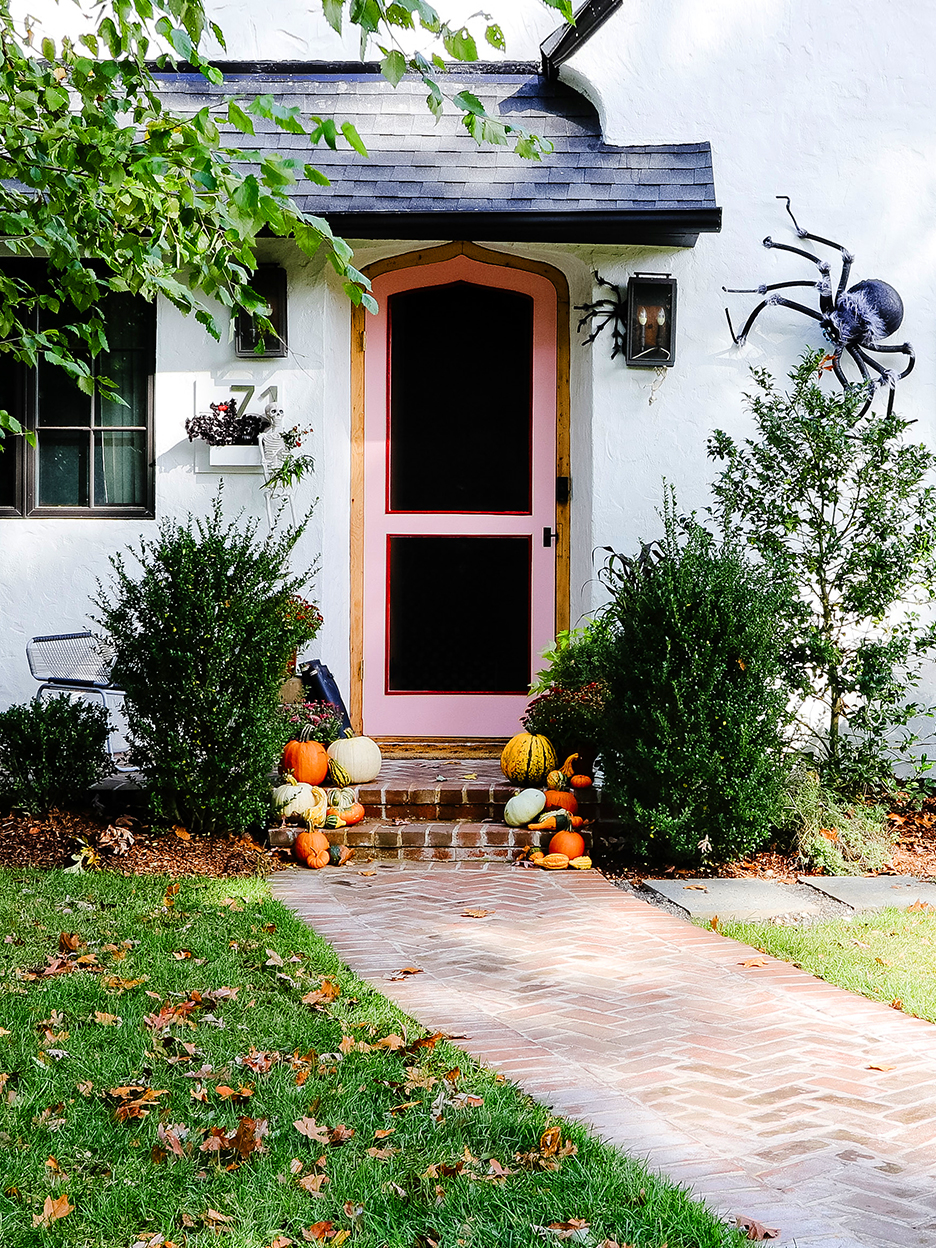
“This is a screen door; this needs to be fun,” is what Acito told herself when browsing paint options for the frame. She thought something neutral might make it look too serious and old-fashioned. Even yellow, which crossed her mind, didn’t seem playful enough. Then she stumbled across Farrow & Ball’s Nancy’s Blushes, a bubblegum pink color. “I didn’t even sample it,” she says. “I bought it, popped open the can at home, and put it right on.” She applied three coats to the back and front of the door frame, leaving one to two days in between each application. Most of the trim on the inside of the door is still original, though she replaced some of the damaged sections with new wood. Acito spray-painted the edges with a glossy red hue from Krylon.
Step 4: The Hardware

Acito stuck with the original hardware out of necessity: They stopped making handle mechanisms that fit a door like this in the ’50s. She spruced up the steel pieces and hinges (also covered in brown paint) by letting them soak in hot water overnight and then rinsing them off with baking soda the next morning. Then she spray-painted all the components black.
Step 5: The Screens

Even though Acito was the most nervous about replacing the screens on her own, it turned out to be the simplest task. Her husband picked up a roll of black screen at Home Depot. Using a staple gun, she attached the fabric to the frame, pulling it tightly along the way to get it as straight as possible (the red trim hides all the staples). It might have taken a month for Acito to get to this point, but she pulled it off without a single splinter.

Our Fall Style issue has arrived! Subscribe now to get an exclusive first look at Ayesha Curry’s Bay Area home—and discover how design can shape our world.