We may earn revenue from the products available on this page and participate in affiliate programs.
After nearly three years of living with her awkward Austin bathroom, Identité Collective founder Anastasia Casey reached her breaking point when the grout in the shower started crumbling. “We were walking on this horrible, pokey gravel,” she recalls. There were other issues that called for a complete reno: The tub took at least 40 minutes to fill up, Casey estimates, and she likens the 30-inch-wide shower—unsuitable for shaving legs—to a “tiny, awful coffin. That’s when I realized enough is enough.”
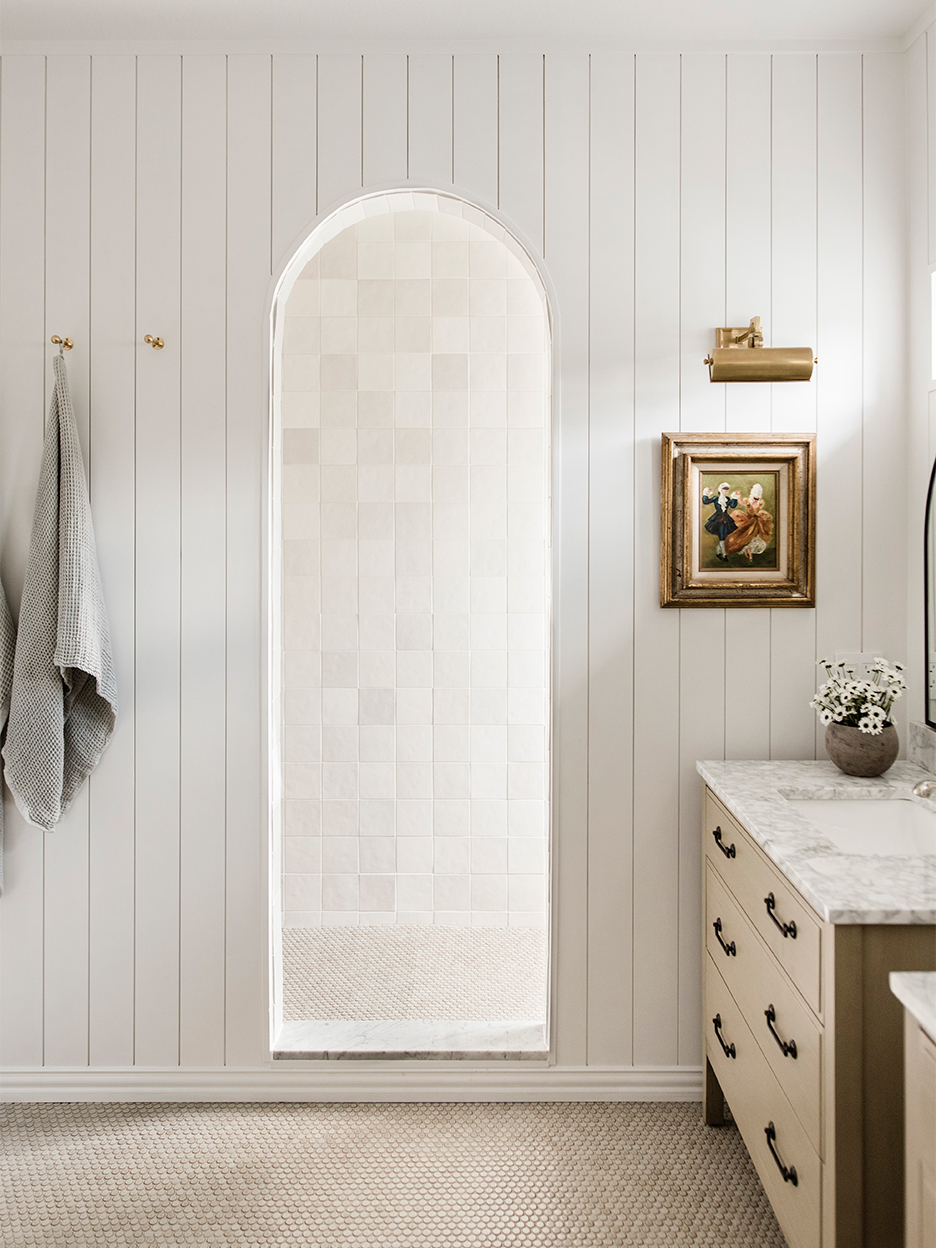
For $17,000 the creative director and her husband made a ton of impactful changes, like replacing the vanities, adding penny tile flooring, and covering the walls in shiplap. Instead of altering the room’s layout, she put the wasted space to work by scrapping the problem tub and turning the back area into a spacious walk-in shower. At the heart of it all? An archway opening—no ugly glass door in sight. Ahead, she shares a few key things she learned from the update.
Work With the Plumbing You’ve Got


If you can help it, not moving around a bunch of pipes during a reno is a huge money saver, particularly if your bathroom is on the first floor of your home (then your contractor doesn’t have to drill through slabs of concrete). Still, even with a second-story bathroom like Casey’s, it can spare you thousands. Their contractor, Austin’s Home Renovation, estimates that the couple pocketed around $3,000 by keeping the existing showerhead valve where it was.
Building off of the pipes that were already there, Casey added a second showerhead by the glass-block window (where the tub used to be), as well as a wand, which comes in handy when the dog needs a bath. “Even though the transformation is night and day, we were actually very minimal in our updates,” she says.
Use Every Square Inch

Gutting the old tub and shower took all of three hours. Casey had expected the crew to pull out the dated beige tiles one by one, but instead they cut the Sheetrock with the stone still attached, sparing them a dusty mess. “My mind was blown,” she recalls. The new framing is composed of sturdy 2-by-4s that can support the weight of tiles and accommodate the depth of the valves. The star of the setup—the arch—starts as a regular rectangular threshold, except the top portion is cut into a crescent shape. “It cozied things up and made for a much more comfortable walk-in,” says Casey, who wanted to steer clear of an austere glass surround. Cladding the outer wall in shiplap rather than tile was another win for the budget: She got more material per square footage for her buck.
Pick and Choose Your Luxe Finishes

Four-by-four-inch tiles from DTC brand Alexander James cover the walls. The dusty white squares have slight variations in their tone, giving them an almost handmade look. The pure white grout lines, measuring an eighth of an inch, accentuate the grid effect.
Casey put their money toward the things she and her husband would touch the most, like the polished nickel vanity faucets from Rejuvenation, and saved on the solid brass showerheads and valves from Kingston Brass, ringing in at $350 for each set.
Streamline Your Shelving

The inset marble shelves inside the shower, as well as the surface of the step leading into the space, are actually kitchen backsplash slabs Casey picked up at Floor & Decor for $13 each. Inside, the 4-inch-wide flat surfaces offer plenty of room for storing products and are easy to wipe down, as opposed to the typical niche. “It makes it feel like we’re at a resort,” says Casey. Staycations will never be the same.
Our Fall Style issue has arrived! Subscribe now to get an exclusive first look at Ayesha Curry’s Bay Area home—and discover how design can shape our world.