We may earn revenue from the products available on this page and participate in affiliate programs.
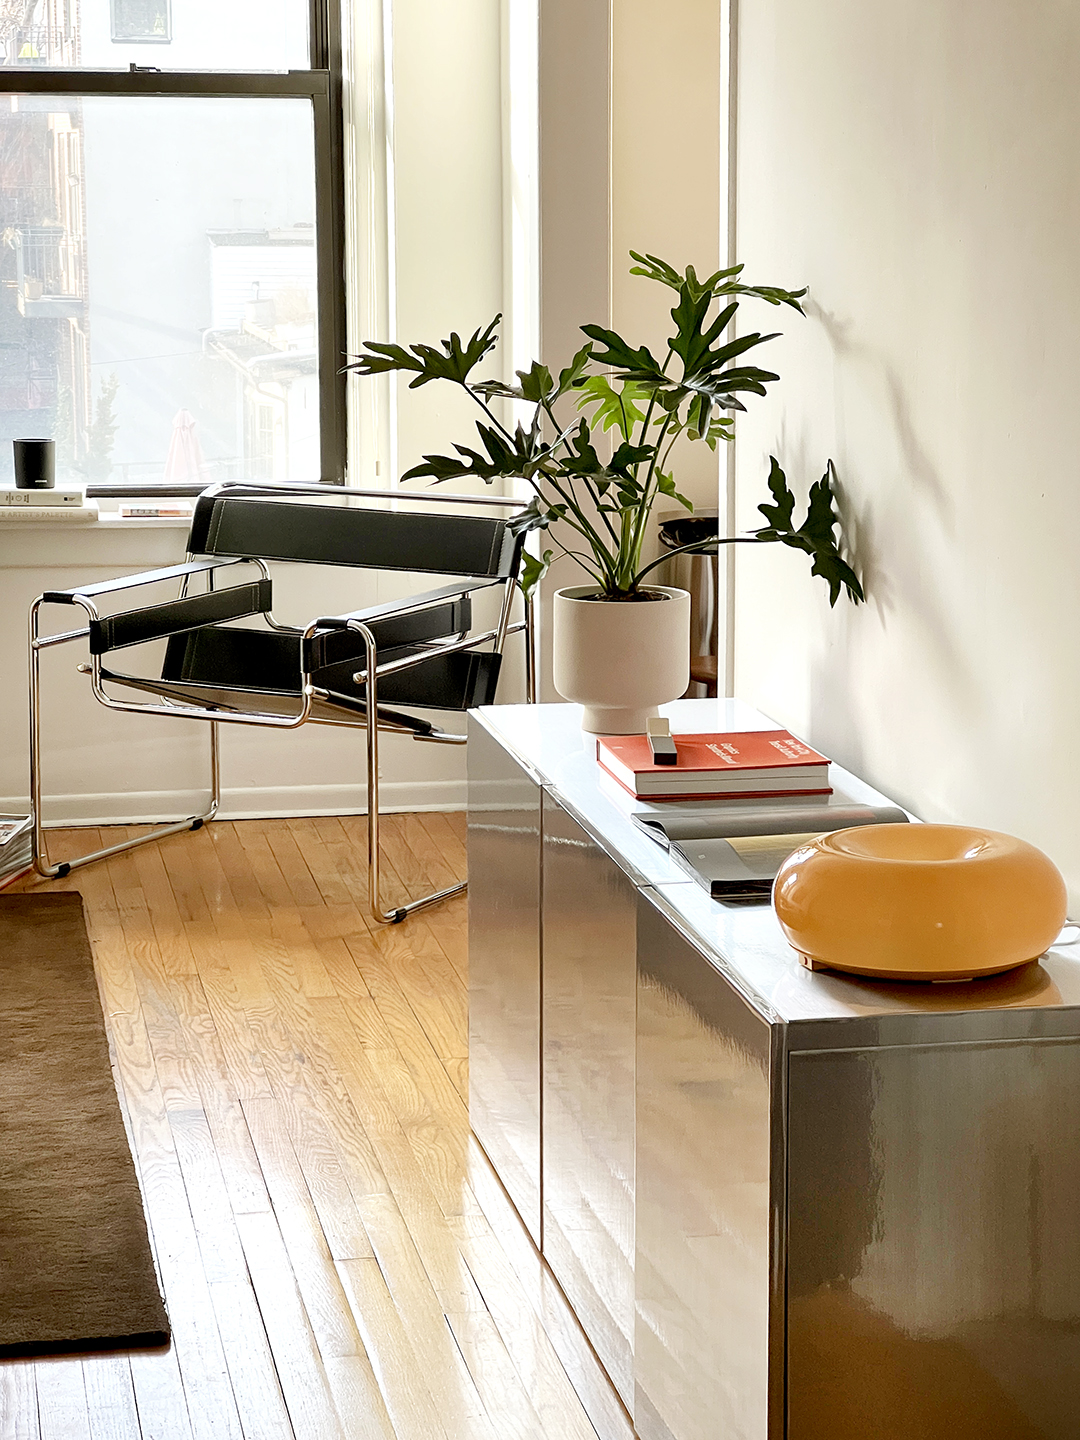
We spend a lot of time scrolling for the best IKEA hacks out there—it’s literally part of the job. So when we came across Dipa Halder and Meher Goel’s latest DIY, we knew we had to share. The Brooklyn-based creatives turned a simple IKEA Besta unit into a high-shine, chrome-finished statement piece that looks straight out of a designer showroom, all for under $60.
The idea came to the friends after Halder moved into a new apartment and fell hard for the chrome trend. “I love that the reflective surface adds brightness to a space while also giving you a sleek and modern look,” she says. “Some of the higher-end stainless steel and aluminum pieces I was eyeing cost multiple thousands of dollars, which was way outside of budget.”
So she did what any resourceful DIY-er would do: She made her own. With an IKEA Besta unit, a few rolls of chrome contact paper, and a bit of patience, Halder and Goel created a chic storage piece. Here’s how.

The Materials
The beauty of this project is that it requires minimal materials, most of which are easy to source:
- IKEA Besta Wall-Mounted Cabinet Combination ($279)
- Chrome contact paper ($30 per roll, two rolls needed)
- Sandpaper
- Scissors (or an X-Acto knife, if you prefer precision)
- A flat-edged tool for smoothing (Halder used a hardcover book!)
The Process


The pair started by partially assembling the Besta unit, leaving off the tops, doors, and outer side panels so she could easily apply the contact paper. Before doing anything, though, they prepped the surfaces: “We lightly sanded all the surfaces to help with adhesion—this step turned out to be really important.”
Next came the wrapping. To keep things looking seamless, they covered the top of the cabinet with one continuous piece of contact paper and cut individual sheets for the doors. “The contact paper’s backing has a helpful grid that makes measuring and cutting much easier,” Halder notes. The trick to a smooth application? “Start by peeling about six inches of the backing, align your contact paper where you want it, and press down that initial section. Then slowly pull the backing paper away underneath while pressing down the contact paper—kind of like laying down a screen protector on a phone, if you’ve ever done that.”
Pro tip: Halder discovered that smoothing the surface with a hardcover book worked well for eliminating bubbles.
The Finishing Touches

The last step was assembling the rest of the unit and wrapping the doors. Corners and edges can be tricky, but Halder found a simple fix: “Use scissors to cut out a small square where the two edges meet, making sure the cut matches the overhang of the paper beyond the corner. Then fold one side of the overhanging paper tightly over the edge, smoothing it down. Fold the adjacent side over the corner; since the small square was removed, the two edges will meet cleanly without overlapping or bunching.”
The End Result

“To me, the best part of this hack is how affordable and accessible it is,” Halder says. “If you’re loving the chrome trend but not ready to spend several thousand dollars on a designer piece, this hack lets you achieve that same aesthetic for much, much less.”
And the technique isn’t just limited to a Besta cabinet: “You can also use this trick with any furniture piece with smooth surfaces—this could be a side table, bookshelves, or even countertops.” So whether you’re after a futuristic, mirror-like look or just want to dip your toe into the trend, this DIY proves that you don’t have to spend big to make a big impact.