We may earn revenue from the products available on this page and participate in affiliate programs.
It’s easy to look at a tiny, closed-off kitchen, point to one wall, and think: I just need to tear that down and—voilà!—the room will be open-concept. But the reality of designing a cooking zone that’s got good flow isn’t that simple. As Nina Jizhar learned while renovating one young couple’s Oakland, California, kitchen, creating a seamless transition between the dining-slash-living area and the once dated cooking space required attention to detail. “My first impression was that everything was not in the right place,” recalls Jizhar.


Whenever the couple was cooking in the space together, they were bound to bump into each other (the fridge was awkwardly situated right by the entry and there wasn’t enough counter space to lay out their baking essentials). That was how Jizhar made the decision to take down the load-bearing wall that separated the space from the adjacent dining area (her clients splurged on a hidden beam for support). In an effort to make the change look natural, she scrapped the kitchen’s old linoleum flooring for oak. “We wanted it to look cohesive with the beautiful flooring elsewhere,” she notes. But by laying it out in a herringbone pattern, she made it different enough that it didn’t get lost amid the new wood cabinetry. “It gives the space more definition,” the interior designer adds. Ahead, Jizhar shares a few more ways she made the transformation appear effortless.
Appliance Tetris


Part of the reason the former space felt so tight, aside from the big wall blocking it from the entertaining area, was that the appliances weren’t in the best locations. Jizhar’s clients splurged on relocating the gas line so they could place their new Café by GE range where the old refrigerator stood. Then they shifted the fridge to the opposite side of the room and surrounded it with pantry cabinets for easy snacking. To stay within budget, Jizhar kept the sink where it was so they didn’t have to move any plumbing around (the only small tweak was incorporating a pot filler over the stove).
Cool (and Convenient) Cabinets

The kitchen, before. 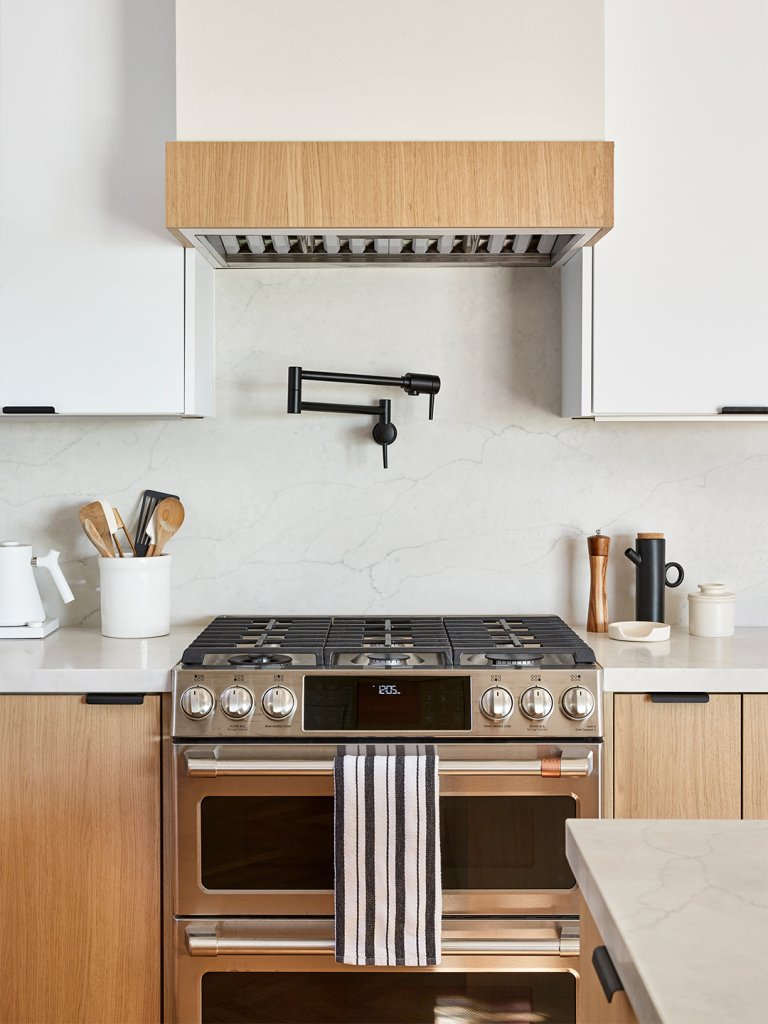
Jizhar removed the dated white cupboards and replaced them with semi-custom, flat-panel ones from a local Silicon Valley company called Demetra Cabinetry. It makes all its products in the San Jose area, so the lead time was fairly short. “The builders were close enough that they could make house calls and troubleshoot hinges or other mechanisms that might not have been working after the install,” adds the designer. While the couple was in favor of a wood-heavy, mid-century–style kitchen, mixing in white upper cabinets helped balance out all the brown tones.
Open Sesame

Who said you can’t have open shelving and upper cabinets in the same spot? Jizhar had the cabinet fabricators make two of the uppers shorter than the rest in order to leave room for open, wood-lined cubbies underneath so the homeowners can display their chic ceramics. “They’re just more unpredictable than floating shelves,” she says of the built-in feature. The “almost vintage-looking” Sereno Bianco quartz countertops and backsplash lend character to the newly renovated kitchen, too.
On Island Time

For an extra layer of dimension to contrast the flat-panel cupboards, Jizhar added fluted white oak detailing to the island (the product comes in a large sheet, so it’s easy to apply to the structure). “Even though it’s within very close proximity to the dining table, they like to eat breakfast there and save the other space for entertaining friends,” she says of the decision to extend the countertop and add seating.
Light Lifeline


Sourcing affordable light fixtures was one big way Jizhar was able to help her clients keep their budget on point. The dining table chandelier is a Wayfair find ($180); the sconce over the sink is from Worley’s Lighting; and the modern piece above the island is Park Studio L.A. “As soon as we finalized the plan, they purchased all the materials, fixtures, and appliances, even before the permit was issued (which took around 12 weeks),” she says. “That’s how we kept the project on schedule.” Getting that coveted flow isn’t cheap or easy, but it pays to be decisive.