We may earn revenue from the products available on this page and participate in affiliate programs.
It was Max Lamb’s terrazzo designs and the floors of Instagrammer and artist Eloeil that Katarina Matsson, content director at Elle Sweden, had in mind when pondering what to do with some uninspired blue and gray checkered linoleum in her south Stockholm row house. “When we first moved in, I immediately knew I wanted a lighter look and considered casting a concrete floor or putting in some kind of stone, but we simply ran out of cash,” admits Matsson. So she followed the design lead of friends Fredrik Paulsen and Axel Bjorklund, who had both used a “confetti” technique to create a DIY terrazzo floor look. “We’d already invested in some of Fredrik’s confetti furniture pieces, so doing our floor in a similar way seemed like the perfect fit,” says Matsson. That her so-called “poor man’s terrazzo” also happens to hide a multitude of child-generated sins has only added to its appeal. “It’s the perfect floor for a family with little kids, since it efficiently hides crumbs and dirt and also camouflages wear and tear!” she notes.
Step 1: The Prep
Matsson’s original floor was decades-old linoleum, but she thinks the technique would also work with any kind of plastic or stone surface. “We had never painted a floor before, so we asked a million questions at the hardware store and followed their directions,” says Matsson. She used a floor-specific cleaning product to ready the surface, then roughed it up with abrasive paper, then vacuumed and cleaned it again. Then she taped all the splines with a special protection tape. “Unfortunately the tape was too strong and it took some paint with it when we were done, so beware!” she cautions.

Step 2: The Painting
Once again, the advice Matsson received for the DIY terrazzo floor project from her local hardware store proved indispensable. “We used a special floor paint, Entré Golvfärg from Alcro, in a slightly off-white color so that the white pieces of paint in the confetti would still be visible,” she explains.
She started with two layers of the aforementioned off-white paint (applied with rollers, a small one for the edges closest to the walls and a bigger one for the large areas), but adds that your own floor may require more or less. “After two coats we felt that one more would be enough for the old floor not to shine through, and then the last layer we painted as we simultaneously threw out the confetti,” she explains. For a slightly bolder effect, Matsson suggests using a more prominent color, like a warm beige or a light pink, for the floor.


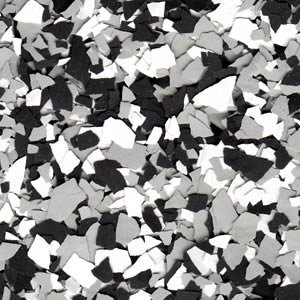
Step 3: The Confetti
Now, about that confetti. “This is the tricky part…but also the most fun!” says Matsson. The confetti (she used the brand Flügger) is crafted from small pieces of dried paint, and the key is to toss it onto the floor while the paint is still wet so the pieces will stick. Don’t be too precious about your confetti placement: You only get one chance to toss it, and there’s only so much steering you can do. Matsson went from one section of the floor to another, painting and then throwing confetti until the whole area was done. “I aimed to throw the confetti upward for the most even result,” she says. “Throwing it too hard or with too much of a forward trajectory can make it bounce off the walls and pile up, especially in corners.” Matsson’s floor, she confesses, turned out a bit uneven, but she doesn’t mind. “I think it just makes it feel more alive and organic,” she adds.
Step 4: The Sealing
When the confetti-ed paint has dried completely, vacuum and seal the deal with two layers of matte lacquer paint (she used Lacka Matt Golvlack from Alcro), and you’re done. Matsson cleans her DIY terrazzo floor as she does her other floors, using a vacuum and mopping with a natural pine oil soap.