We may earn revenue from the products available on this page and participate in affiliate programs.
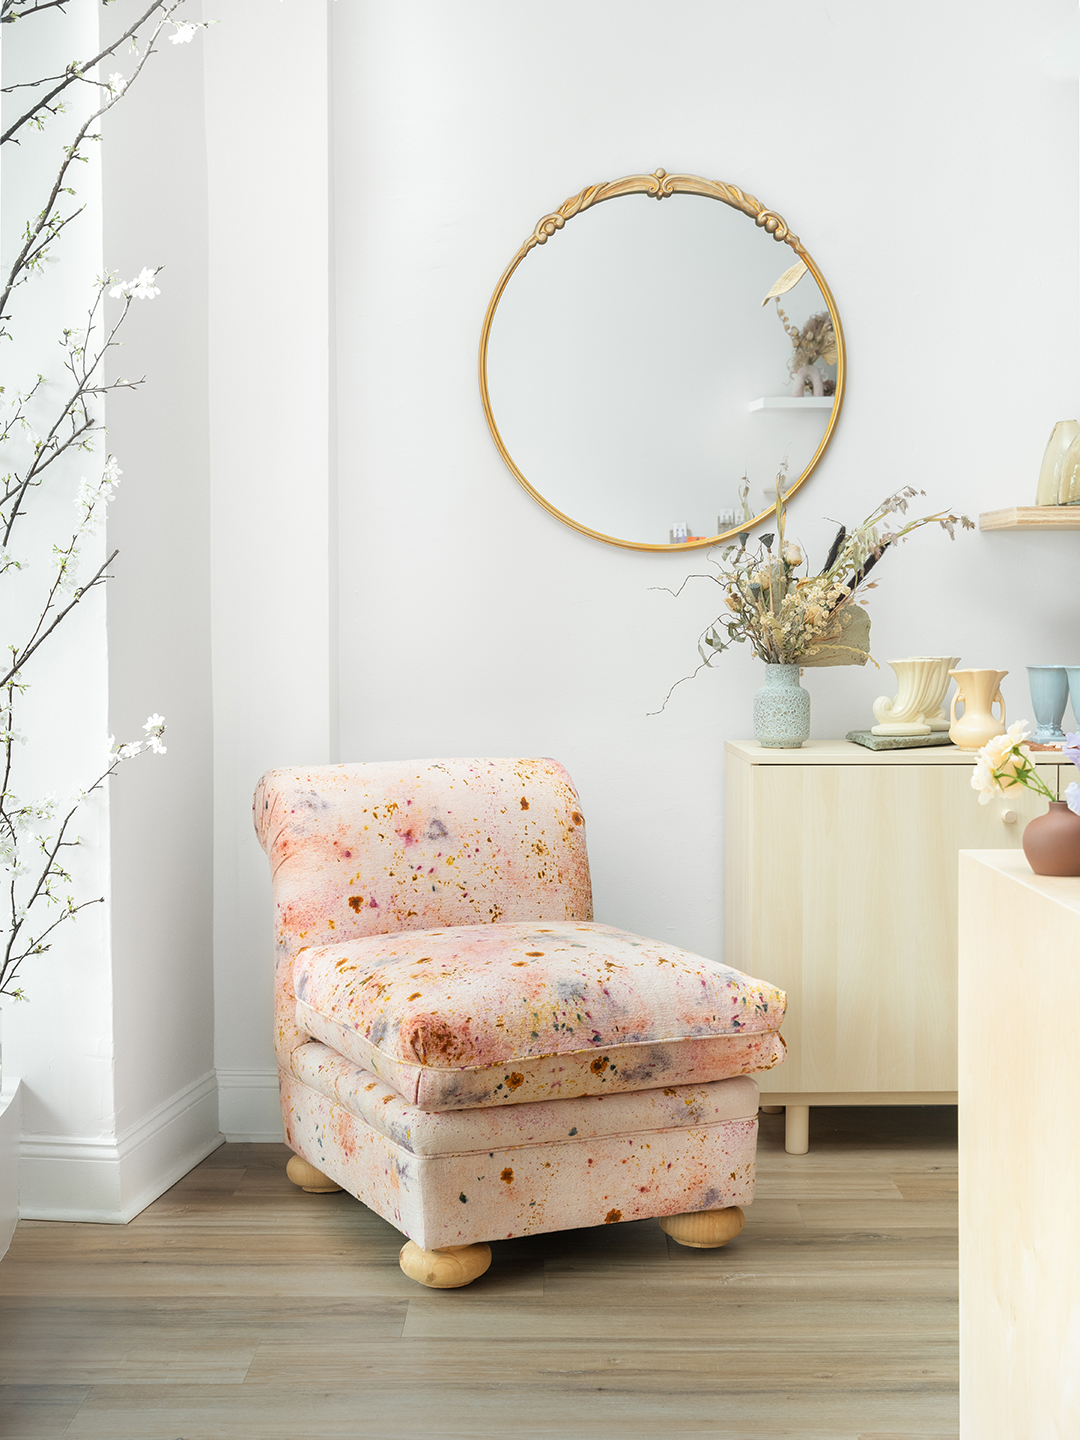
When Hollie Velten-Lattrell began conceptualizing the design of Wildly Floral Co., a flower shop in South Orange, New Jersey, she could think of no better collaboration than this one. “I knew I wanted to incorporate DyeKween‘s work,” she remembers. Enter Amanda de Beaufort, aka DyeKween, known for her work tinting fabrics with botanicals. It was a match made in floral heaven.
The task: reupholstering a vintage chair, an ’80s find with bulbous feet, in a bright and bold pattern fashioned from none other than flowers. The result is a speckled pastel corner for shoppers to take a load off, but also a reflection of Wildly Floral Co. owner Josi Stone’s talents. “It has a lot of utility but also represents the poetic, untamed nature of Josi’s floral work,” says Velten-Lattrell. “Just like her arrangements, it’s beautiful but not too precious. It’s touched by hand, artful, and approachable.”

Reupholstering a chair is admittedly a major undertaking, but there’s no stopping you from flower-dyeing fabric on a smaller scale. How about a table runner, napkins, or pillowcases? Just keep in mind that not all flowers work for botanical dyeing. Some of de Beaufort’s go-tos: coreopsis, cosmos, hollyhock, and marigold. You can also add roses, onion skins, eucalyptus, and even some tea leaves for small bursts of color. Read on for de Beaufort’s step-by-step process.
The Supplies
- Any 100 percent natural-fiber fabric, like linen, cotton, bamboo, or hemp (de Beaufort used a heavy cotton upholstery fabric for her project)
- Food scale
- 5-gallon bucket
- Aluminum acetate
- Calcium carbonate
- Wooden spoon that you don’t use for food
- Dye flowers
- White paper
- String
- Scissors
- Tongs
- Oven mitt
- Large stockpot fitted with a steamer insert and lid that you don’t use for cooking
- Gentle, pH-neutral laundry detergent
How to Flower-Dye Fabric

Step 1: Scour the Fabric
“Scouring is a fancy word for washing really well,” says de Beaufort. To scour, machine-wash your fabric on a regular or heavy-duty cycle on the hottest setting. This process scrubs the fibers clean of any waxes, starches, and oils that can stick to the fibers during the manufacturing process. Line-dry the fabric, or machine dry it using the recommended heat setting for whichever fiber you’re using. (FYI: Wool and silk cannot be scoured in a machine; for those, do this process on a stovetop.)
Don’t even think about cutting corners by nixing this step. “Your colors will not print as clear and bright, and they’ll wash out,” warns de Beaufort. “It would be like painting a really dirty wall.”
Step 2: Soak the Fabric in Mordant
Consider the next couple steps a real-life version of chemistry class. First up is “mordanting” with aluminum acetate, which will help the dye bond to the fabric. Weigh your dry fabric using a food scale, then measure the aluminum acetate to 5 percent the weight of your fiber. No food scale? De Beaufort offers this rule of thumb: a standard cotton tee is about 150 grams.
Next, fill the paint bucket with hot tap water—“the hotter, the better,” notes de Beaufort. Dissolve the aluminum acetate, then toss in your fabric. Soak it overnight (or, at minimum, two hours), then rinse. Aluminum acetate can be disposed of in your garden or down the drain.
“Scouring and mordanting are the most important steps,” de Beaufort says. “Do not skip them. Otherwise you will not get good results—trust me.”
Step 3: Prepare a Chalk Bath
Fill your bucket again with the hottest tap water your sink can provide, then add the calcium carbonate (aka chalk) at 20 percent of the weight of the fiber. Dissolve the chalk, stirring with the wooden spoon, and add the mordanted fiber. “This process fixes the mordant to the fiber and creates a chemical bond,” says de Beaufort. Soak for 30 minutes, then rinse and squeeze out all of the excess water.
Step 4: Place the Flowers

Spread out your damp fiber on any counter, floor, or worktable. For bigger projects, using a drop cloth outside works well, too. Place your flowers on top of the fabric, creating a loose repeating pattern. “I like controlled randomness,” says de Beaufort. Imagine it like polka dots, just with flowers. You can arrange the flowers facedown or -up—your choice. Facedown will transfer more vibrant color and showcase the shape of the flower, while the backs will produce fainter hues and outlines.
Step 5: Fold, Roll, and Bind
Once your floral print is composed, place a piece of clean white paper over the design and roll it very tightly, pressing the fabric flat as you go. When you’ve got a flattened fabric burrito, roll it again, starting from one of the short ends, to create a seashell shape of sorts. “You want the fiber to have close contact with the plants,” says de Beaufort, but, she admits, “the first fold can be a little tricky.” Some flowers will move, and that’s okay. It’s all part of the process. Once rolled up, bind it as tightly as you can with string.
Step 6: Let It Steam

Bring 2 to 3 inches of water to a boil in the stockpot with its steamer insert inside to “steam the fabric like a dumpling,” says de Beaufort. Simply set your fabric in the insert, cover the pot with a tight-fitting lid, and “make a cup of tea and relax,” she suggests.
The steaming process allows the flowers to release their color onto the fabric, as the natural chemicals that give the plant color transfer to the fiber and bond with the aluminum salt. “It’s magical!” says de Beaufort.
If you want to sneak a peek midsteam, use tongs and an oven mitt. Beware that it will be very hot. “I have burned my arm more times than I’d like to count,” de Beaufort notes.
Step 7: Unfold and Rinse
Turn off the heat and let the fabric cool, during which the colors will continue to transfer. “I have been doing this for six-plus years, and I still can never wait,” de Beaufort admits. “It’s like Christmas morning!” Then unfold your fabric and remove the paper. Pick off the flowers individually, or let them rinse off in the sink (as long as you have a garbage disposal) with cold water. Continue rinsing until the water runs clear.
Step 8: Launder and Love

Hand-wash your fabric using cold water and “just a drop” of gentle, pH-neutral detergent; the same goes for future washings. If you must machine-wash, use the cold, delicate setting. Line-dry the textile whenever possible, or if you must, machine-dry on whatever temperature is recommended for the material. To preserve your beautiful creation, keep it out of direct sunlight and limit those washings, but bear in mind that all natural dyes will fade over time. “That is part of the beauty,” says de Beaufort.