We may earn revenue from the products available on this page and participate in affiliate programs.
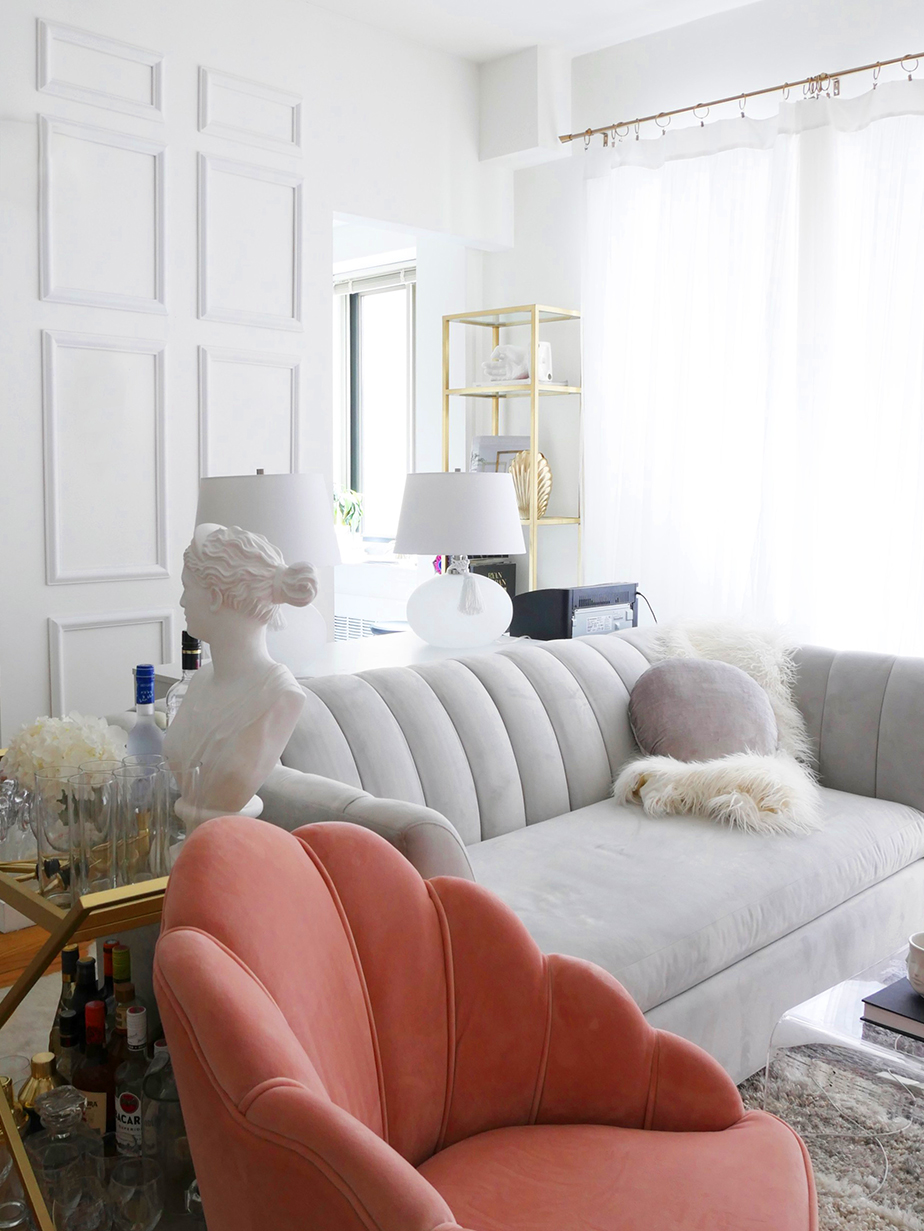
Chelsey Brown has been a renter for five years, and each space she’s lived in has presented new compromises. Chief among them: charm. “I always wanted wainscoting in my home,” says the New York City–based blogger and author of Rental Style. “I spent months trying to figure out a way to make it happen.”
Enter: Polyurethane wall panels. The wood frames are ultralight, meaning they can be mounted to the wall with double-sided adhesive. Transforming one area in her living room only cost $150 (the labor alone to add the real deal is at least $1,000, Brown notes). Not only do the decorative panels stick, but they look legitimate. Here, Brown walks us through how to get that coveted prewar apartment look wherever you go.
The Supplies


- Polyurethane wall panels
- Corner Velcro strips
- Painter’s tape
- Measuring tape
- A miter box and saw (optional)
- Paint (optional)
Step 1: Map It Out
Before you purchase your panels, mark where you want to place the frames on the wall with blue painter’s tape. (The bigger your wall, the bigger you’ll want the rectangles to be so the scale doesn’t look off.) As a general rule of thumb, Brown suggests spacing the shapes 4 inches apart. And not all of the panels have to be the same size. In her space, Brown cut down the two closest to the ceiling so they were shorter than the others. “I wanted to do something a little bit different to give it more character,” she says.
Step 2: Cut Around Any Obstacles
If there’s an outlet or electrical box in your way, you will need to invest in a saw (or call in a TaskRabbit to lend a hand). The blogger used a miter box to protect her floors and get a perfect cut.
Step 3: Color Match
Brown was lucky that the white panels she ordered matched the color of her living room walls (almost) to a tee. If that’s not the case in your space, paint the wood frames and let them dry before sticking them on the walls, that way the detail looks like it’s always been there.
Step 4: Tape Them Up
Add the Velcro strips to the back four corners of each panel and press each frame firmly to the wall. “I hosted so many parties in that space over the course of two years and not once did they fall down,” says Brown. If you’re looking to keep the faux wainscoting around permanently, you can also use a nail gun or glue to secure them. The benefit of the tape is that it’s 100 percent removable—simply take them down when you move.
Step 5: Fill in the Gaps (or Don’t!)
While wainscoting looks chic on its own, you can also get creative with hanging art or temporary wallpaper within the rectangles. Just be sure not to hang anything from the molding itself (it can’t support the weight). “Just because you live in a rental doesn’t mean you can’t make it your dream home.”
Introducing Domino’s new podcast, Design Time, where we explore spaces with meaning. Each week, join editor-in-chief Jessica Romm Perez along with talented creatives and designers from our community to explore how to create a home that tells your story. Listen now and subscribe for new episodes every Thursday.