We may earn revenue from the products available on this page and participate in affiliate programs.
For hands-on advice from designers and pro DIYers, plus more scrappy before-and-after transformations, subscribe to Reno. Let your in-box do all the hard work—for now.
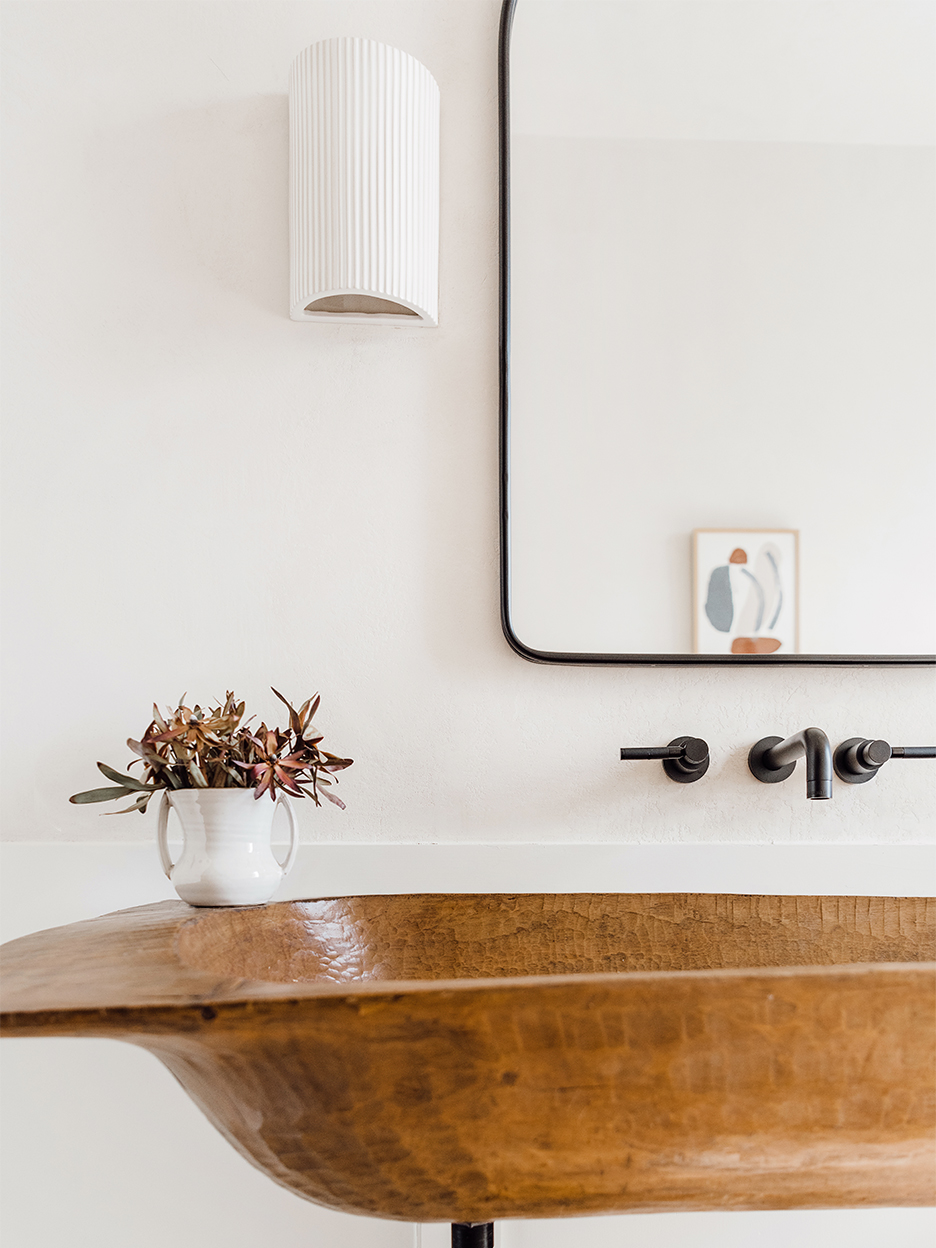
Back in the day, dough bowls were purely functional. Their job was to provide a warm, snug place for bread to rise prior to going in the oven. Now they’re just for good looks. You might find one on a kitchen island, filled with lemons, or perhaps atop an entry console table, displayed like a sculpture. But in Camille Styles’s Austin home, the former baking essential is so much more than just a pretty vessel: It’s a sink in her powder room.
“For the longest time, I had played it very safe in that room,” she says. Styles was only 26 when she and her husband built their house, so at the time, she opted for “cookie-cutter” finishes—think: shelves that matched the mirror that matched everything else. “Ten years later, I was like, this room does not reflect me at all,” she notes. Now a fan of items with texture and a story behind them, Styles found herself scouring Pinterest for fresh sink ideas. She kept gravitating toward found objects, like stone troughs and fountains, but then she thought, what about wood? “It’s a very long and narrow space, so I needed a shape that would go with that,” she explains. Cue the oversize dough bowl.
Surprisingly, Pottery Barn sells one-of-a-kind antique ones for anywhere between $200 and $250. Styles picked up her catchall curbside, loaded it into the trunk of her car, and brought it home, where it sat on the floor of the bathroom for weeks while she mulled over how she was actually going to pull this off. Read on for how the project panned out.
Step 1: Waterproofing the Weathered Wood

This was something Styles didn’t know was even possible until she did a deep dive into sealers. “My husband was like, this is not a good idea,” she says, laughing. In order to protect the material, she applied a combination of three products: Watco Tung oil (first), Varathane urethane oil–based sealant (second), and Olympic waterproofing sealant (third). It’s important to leave several hours of drying time between each to ensure the treatment is fully absorbed, she notes.
Step 2: Securing It
The part that took the longest was installing two steel brackets into the wall that would cradle the bowl underneath the base of each side. Styles’s framer, James Downing, welded the pieces.
Step 3: Getting Proper Drainage

Because the bottom of the bowl isn’t flat, Styles couldn’t drill one hole right in the middle like she initially planned (water would pool in the corners). So she and her plumber ended up going with two openings, one on each side, instead.
She soon realized the P trap (the U-shaped pipes that prevent sewer gases from rising up) she purchased for the setup wasn’t wide enough to handle the water pressure coming from two drains. “That was one of those things that way surpassed my plumbing knowledge,” she says. Her husband kindly ran out to the hardware store at the last minute to exchange the parts.
Step 4: Turn It On

Even the fact that Styles chose wall-mounted faucets for the sink turned out to be an engineering feat when they realized there was a stud in the spot they wanted to mount the hardware. “My plumber wanted to go to the left or to the right. But the problem there was that my electrician had already mounted new sconces into the wall, and the mirror was centered between the lights,” she explains.
They eventually found a way to partially secure the faucet to the stud without damaging it, but it taught her a key lesson about construction: Sync with all of your subcontractors about your master plan before you start work. “Everything is a domino effect,” she says. “That would have saved us a little bit of a headache.”
In the end, the whole project cost $2,400 (the bowl was $250; the faucet handles, pipes, and drains were $400; and labor was $1,750). So was it worth it? “I think it definitely was,” answers Styles. She points out that to get a big, beautiful stand-alone sink delivered and installed would have cost more and not looked nearly as unique. As she says, “It makes the room.”
Our Winter Renovation issue is here! Subscribe now to step inside Leanne Ford’s latest project—her own historic Pennsylvania home. Plus discover our new rules of reno.