We may earn revenue from the products available on this page and participate in affiliate programs.
Restoring, repurposing, restyling. There’s a lot that goes into sprucing up an historic home, and no one knows that better than Zio and Sons’s Anthony D’Argenzio. In our bimonthly column, he takes us through every design detail in This Old Hudson Maison, his latest passion project in upstate New York.
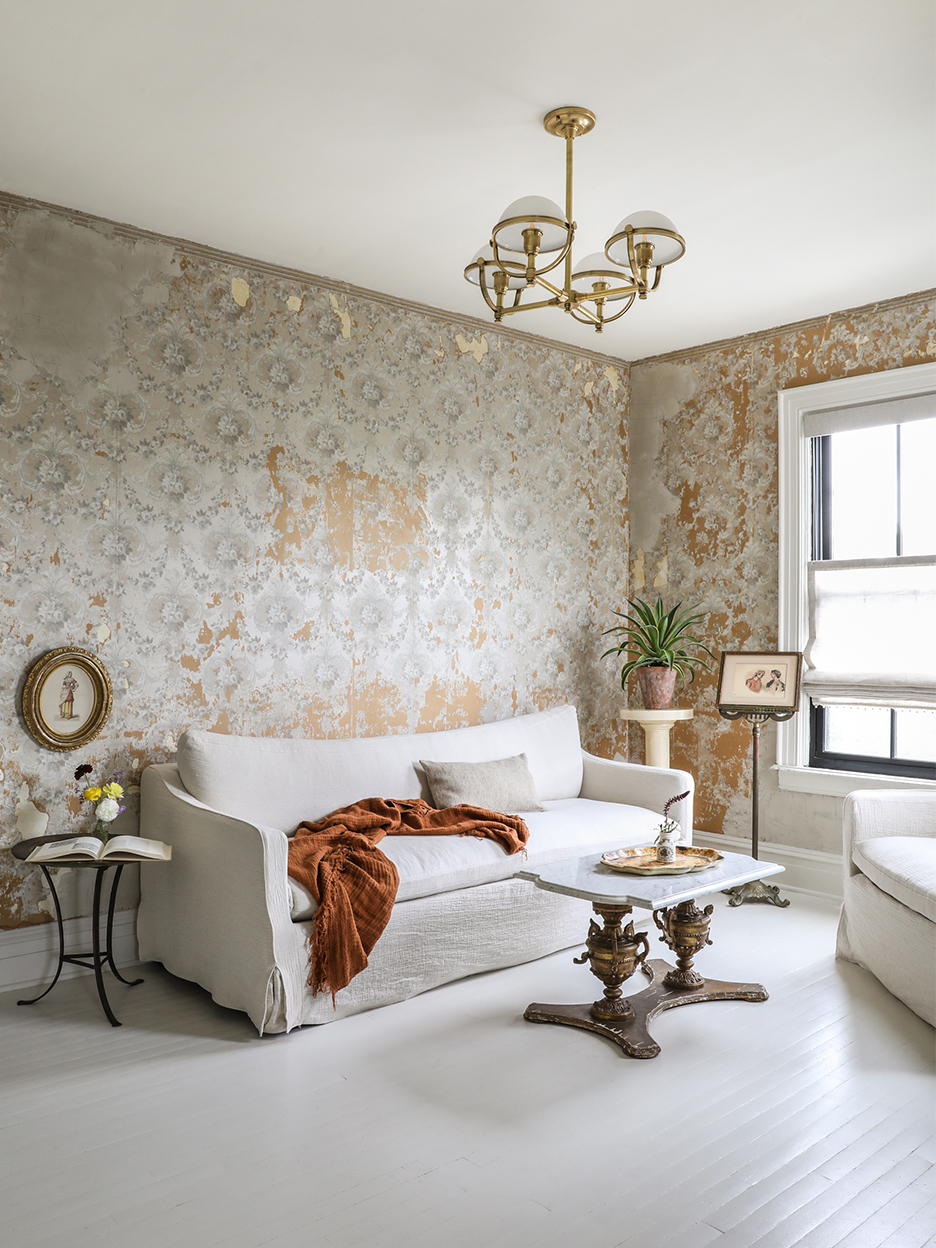
I spotted the first few pieces during the demo process. The wallpaper was peeking out from under beige remnants of another paper that was probably put in in the 1950s—it was a gamble to start scraping since the original was probably from around 1910, but I was really intrigued by the discovery. It had a classic, old-world motif that felt timeless, like it could be re-created today, and the silvery muted tones worked so well with my aesthetic. We ended up scraping away the whole living room, and I loved it so much we continued it through the master suite.
There’s not an exact “recipe” for navigating found wallpaper—it’s mostly just trial and error. First, think about whether or not you like the pattern. If you do, the design plan will evolve naturally. Once I decided to keep it, we painted the floors white to balance it out, and since the paper was so textured, we brought in softer tones through the linen drapes and sofa upholstery. For the finishing touches, we played off the ornateness of the motif with gilded golds, brass, and antique-y fixtures.


In terms of preserving it, it all depends on whether you want a high-texture or low-texture look. Get creative with how much you remove: Leave some areas layered with the newer finishes (in this case, that’s the ’50s wallpaper) on top for the former style, or pare it all back for the latter. I like to use a paint scraper that’s not too abrasive—you don’t want to damage the original piece, so be precious with it and avoid steaming anything off, which will add water damage. The real key is taking your time. Turn on some music, work with someone else, and make a day of the project.

After everything was removed, I used plaster as a patching technique. I had a bunch of true Venetian plaster from Master of Plaster left over in my basement from another project—it has a real lime base with Carrara marble dust that almost makes it glitter. I decided to use it in certain areas so the room felt more finished, balancing out the detailed pattern with a natural element.


I think watching YouTube videos is really helpful for learning the application (this one and this one are two favorites). Don’t just buy a bucket of plaster and think you’re going to know what you’re doing! The general formula is applying one base coat with a trowel, letting it completely dry, and then adding two layers of a finish—wait a day between each one, and be sure to have a drop cloth handy because it’s kind of messy. Some other best-practice tips I learned:
- Create a blank slate. Before you start, go over the wallpaper with a dry brush to get rid of any loose particles. (Be sure to wear a mask, because some older papers could have materials that aren’t the best to be breathing in.) You also might have to glue some of the edges back to the wall if they started peeling.
- Avoid the heat. Don’t plaster walls on super-warm days—it dries pretty quickly, and if you don’t apply it properly, it’ll crumble up and fail on you. If it is hot out, use a spray bottle to spritz water onto the surface to keep it moist.
- Practice beforehand. If you’re scared you’re going to mess up, buy sheets of drywall to play around with before you start working with the real thing.
All in all, preserving and plastering old wallpaper isn’t as daunting as everyone thinks it is. It’s labor-intensive and time-consuming, sure, but it’s a really cool finish.
Check back in two weeks for the next story in our series, in which D’Argenzio explains how he mixed and matched the perfect bathroom finishes to honor the building’s heritage.
As told to Elly Leavitt.