We may earn revenue from the products available on this page and participate in affiliate programs.
Painting a ceiling is a big job, one that leaves most people feeling like they’re in over their heads (see what we did there?). But you can stop moving the task to the bottom of your to-dos, because we’ve got some good news: It’s totally doable with a little prep work and a plan. Ahead, we walk you through everything you need to know about how to paint a ceiling, thanks in major part to expert advice from Nicole Gibbons, founder of Clare, and interior designer Campbell Minister.
The Best Type of Paint for Ceilings

Look for paints that are specifically formulated for ceilings—they tend to have a lower viscosity than your average wall paint, which will help you avoid dripping the stuff everywhere. Gibbons is a proponent of a nonreflective, flat finish. “It reduces glare from artificial lights overhead,” she notes.
Paint-Color Ideas From the Pros

Both Gibbons and Minister love a good, classic white. “It helps reflect natural light around the room, making it feel brighter and more open,” notes Gibbons. Minister appreciates the way it can hide imperfections. Her two favorite shades: Ceiling White by Benjamin Moore and Ceiling Bright White by Sherwin-Williams.
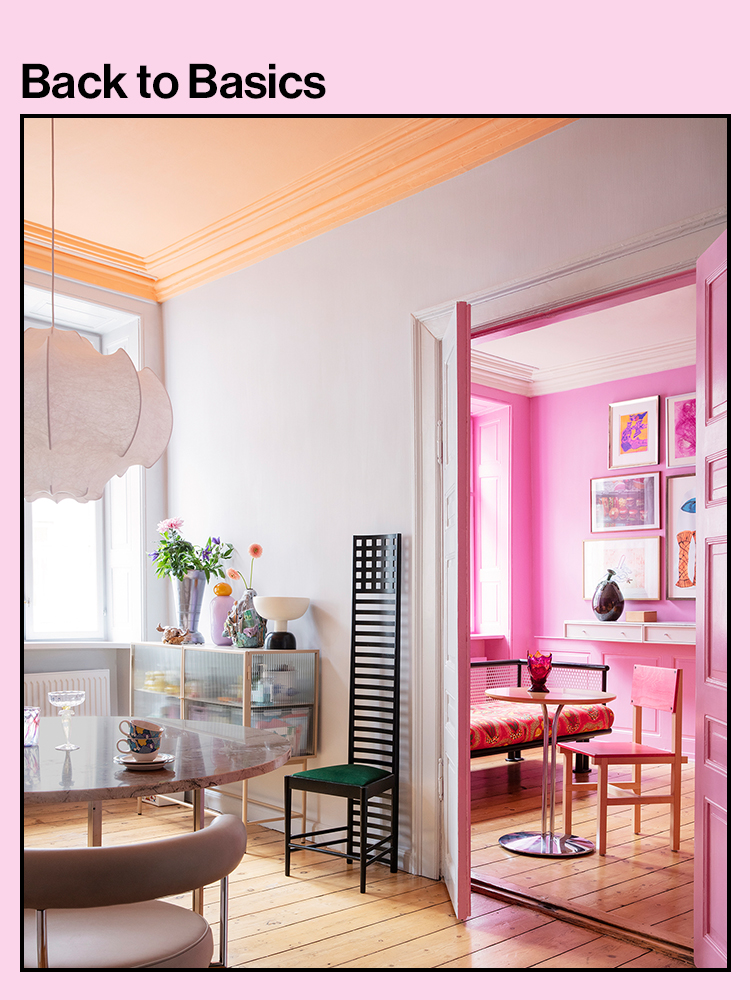
“For someone more adventurous, a color on the ceiling can be really impactful,” says Gibbons, especially when it’s carried through to the walls and trim for a monochrome effect. “It’s always fun to go bold, such as a vibrant pink,” she adds.
Minister shakes up a neutral choice by switching up the finish on the molding. Pairing a white ceiling in a flat finish with satin white trim “creates a calming, cohesive look,” she says.
How to Paint a Ceiling

The Supplies
- Drop cloths or plastic sheeting
- Painter’s tape
- Spackle
- Putty knife
- Vacuum with soft brush attachment
- Sandpaper
- Paint tray liners
- Paint tray
- Paint roller and extension pole
- Angled paintbrush
- Primer
- Ceiling paint
Step 1: Clean Out and Cover Up
Remove as much furniture as you can from the room and cover any pieces that must remain with plastic sheeting. Take down light fixtures, smoke detectors, and anything else that may be in your way. Then lay drop cloths on the floor and tape them to the baseboards. (For maximum protection, have the cloths overlap by about a foot.)
Step 2: Protect Your Walls
If your walls are already in good shape, hang plastic sheeting around the room to protect them from any rogue paint splatters. Don’t forget the doors and windows, too! Lastly, use painter’s tape to section off the ceiling from the trim.
Step 3: Prep the Ceiling
Check the surface for any cracks or holes and make repairs with Spackle as needed (just keep the additional drying time in mind). Sand them down for a smooth finish and vacuum your ceiling to suck up any residual dust.
Step 4: Gather Your Supplies
Add a fresh liner to your paint tray and put a new roller cover on your roller frame. PSA: Your roller should go on the extension pole after you dip it into the primer or paint, not before.
Step 5: Prime the Ceiling
Using an angled brush dipped in primer, cut in the edges of the ceiling to cover any areas that the roller might miss later. Follow that with a coat of primer, applied with your extension pole. Let it dry completely and repeat with a second coat if needed. (Psst: The drying time for your first coat depends on the paint’s viscosity, temperature, and even humidity. A good rule of thumb is to let it dry for at least one hour. For best results, follow the directions on your paint can.)
Step 6: Paint Your Ceiling
Replace the paint tray liner and pour your ceiling paint in. Swap out your roller cover, too. Working in small sections (anywhere from 3 to 5 square feet is fine), roll on the first coat. As you begin each new segment, be sure to overlap your roller (and paint) onto the wet edges of the preceding one. Known as “keeping a wet edge,” this win-win technique not only serves to break the task down to a much manageable level, it prevents noticeable roller marks. If necessary, apply a second coat—and proudly check this project off your list.
Pro tip: To avoid streak marks and ensure even coverage, apply the paint in a W shape, then fill in the blank spots until you have a solid square.
The Secrets to Painting a Ceiling That Isn’t Flat or Smooth
Popcorn Ceiling
“All the little grooves of a popcorn ceiling create more surface area to paint than if the ceiling were smooth,” says Gibbons. “This means you’ll need more paint.” Her go-to formula: Buy 20 percent extra (so if you are painting a 100-square-foot room, account for 120 square feet). While you’re at it, she also recommends purchasing a paint roller with a ¾-inch nap. The longer fibers will soak up more paint and easily get into the texture’s nooks and crannies.
Vaulted Ceiling
“With a little extra effort you can definitely tackle painting your vaulted ceiling,” says Gibbons. The trick is to paint from the solid ground with a 9-inch roller and extension pole instead of climbing a ladder. “Start at the highest point of the ceiling and simply work your way down in small, straight lines,” she explains.