the easier-than-it-looks bedroom makeover!
a classic case of getting the bedroom you REALLY want.
Published Jul 21, 2015 5:00 AM
We may earn revenue from the products available on this page and participate in affiliate programs.
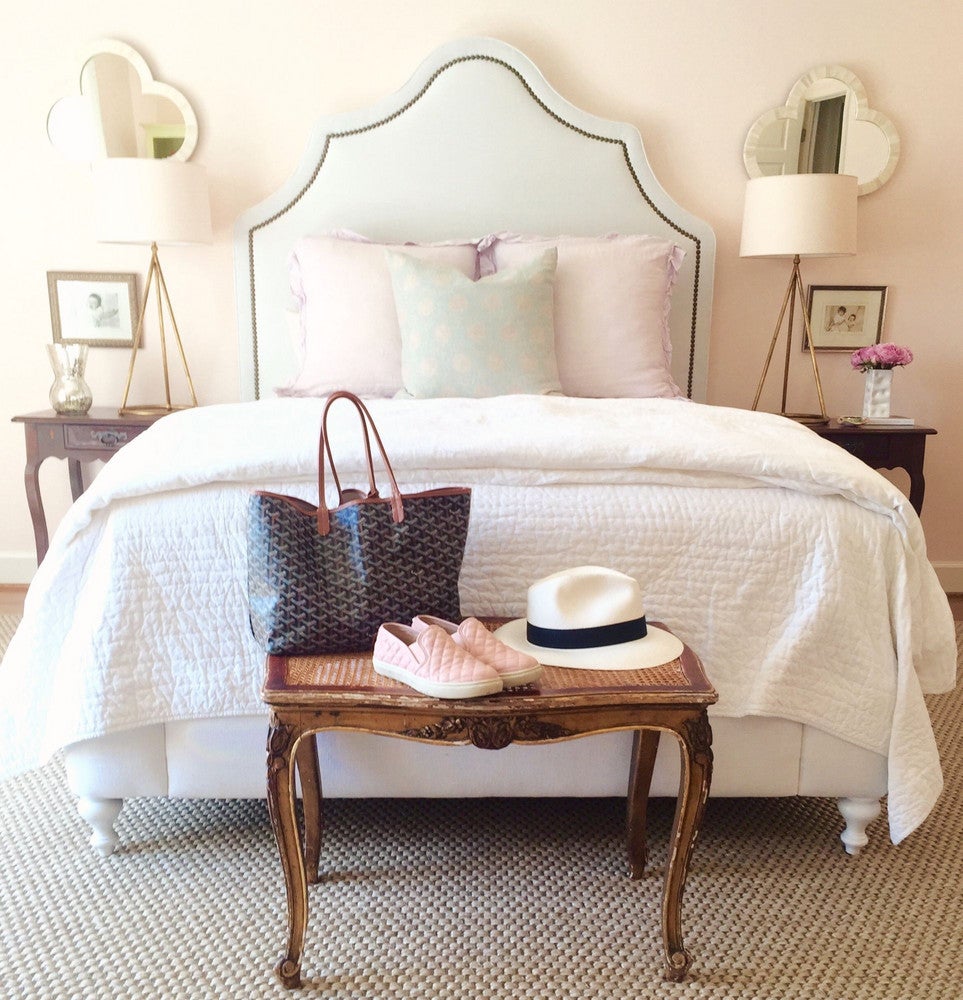
Above, the finished product.
My sister is my best friend, so the opportunity to help create a space for herself was the best project I could have asked for. I really wanted her personality and interests to shine through in her space. Before starting the redo, we decided on a color scheme of blush pink, gold, and white. Our hope was that the room would be personal and peaceful—a real retreat.
Above, before we began.
She had many of the basics—a bed, a chest, a desk, a bookshelf—but the room was lacking cohesion. It also felt very young, so bringing sophistication to the space was another goal. Our largest investment was a rug; we decided to go with a natural fiber rug so that we could have fun layering different things on top of and around it. After that was in place, we cleared off all of the room’s surfaces.
I gathered everything we had to work with into a “staging” area in the room so that we could edit and delete from there as we put things back. We grouped items on her bookshelves by color and threw in white and gold accent pieces. To create continuity in the room, we added some gold and white accessories on her desk and chest. We brought in a tray to hold her perfumes and hung a gold mirror over her chest.
Pro tip: Always try to imagine how you could repurpose your own belongings before getting rid of them.
Clients often think that they need to get rid of everything they own in order to get the look they want. My job is to help them fall back in love with their home—and part of that is helping them fall back in love with their things. Of course, I love to make suggestions and bring new items in, but clients’ existing possessions often have more potential than they initially realize.
Additionally with this project, we wanted to try to do it quickly. We aimed for a one day makeover to show that a total overhaul isn’t necessary to create a big change! I thought that we could create the room of Caroline’s dreams by adding a few key pieces to her existing things. To get organized, we had a meeting the day before to discuss what she wanted. The next day, I went to West Elm and some of our local shops, where I was able to find key items (like the mirrors and lamps) at good prices. After collecting everything we needed, we spent the afternoon putting the room together with the new and existing items. (Earlier in the day, we had edited her existing items down to the things we knew we wanted to use. When it came time to put everything together, we were able to do so quickly.)
Tips before you begin:
Before the redo begins, have a plan. Find pictures to help you define the look you’re going for. Evaluate your things. Be creative—your possessions can fill new roles in new places. Then, put pen to paper. Make a list of the things you think you might need. Sketch out how you’ll use them. Next, approach your existing things. Move them around, switch them out—whatever you need to do to see them differently. I promise you’ll be surprised!
If you have bookshelves or other surfaces, take everything off and then group it all together. Edit and delete where you can. Then put it all back in a new way. This is a big-time game changer!
We loved her bed, but it was on a big wall and felt kind of lonely. While out gathering things for the job that morning, I came across some gold lamps and white bone inlay quatrefoil mirrors. It was an “Aha!” moment! We added those on both sides of the bed to give that wall some interest, and it was perfect.
Before I found the lamps, my sister had thought that she wanted to get rid of her dark brown wooden bedside tables and replace them with white or gold ones. But after I showed her how we could use the gold lamps for a very similar effect (and for less money!), we both agreed that we liked the contrast of the dark wood.
See more from Katherine Parker Bramlett here!