Bookmark This: A Pro Guide to Choosing IKEA Kitchen Cabinets
Because you can’t try before you buy.
Updated Oct 12, 2018 12:20 AM
We may earn revenue from the products available on this page and participate in affiliate programs.
From a cosmetic cupboard facelift to a down-to-the-studs makeover, kitchen renos are exciting projects to tackle, albeit daunting as decisions and dollar signs add up. Houzz’s latest Kitchen Trends Study reports that today’s average major kitchen remodel (new cabinets, appliances, the works) rings in at a whopping $35,000.
Faced with an overwhelming amount of options to splurge or save on, it’s not surprising that so many home renovators turn to IKEA’s kitchen cabinet offerings to keep costs down. The cult-followed Swedish retailer poses a significant opportunity to save—money, that is. Time? Not so much. Planning, ordering, and installing your IKEA kitchen cabinets is a vast and nuanced terrain to navigate. Since you can’t try before you buy, consider this your road map of everything you need to know.
Cost
First things first: Let’s talk price tag.
Considerably less expensive than other options on the market and designed to be modular, IKEA kitchen cabinets pose a cost-effective alternative to designer or custom cupboards. They’re an especially good bet if you’re looking for a bespoke feel on a budget, working with a rental and want to minimize your investment, or anticipating even bigger kitchen updates down the road.
South Londoner Hannah Roberts chose IKEA kitchen cabinets while remodeling her late-1920s terrace house. With plans to ultimately knock down a wall and extend the kitchen space into her backyard, Roberts needed a cabinet facelift to hold her over—good quality at an accessible price.
IKEA offers financing options, so you can stagger the cost over a period of time. “In a reno, there are so many expenses all at once,” says Roberts. “It’s really helpful if you can spread them out.”
Roberts sourced her cabinet frames, appliances, and installation help all from IKEA, totaling about $7,000. For a more bespoke look, she added cabinet doors, plinths, and fillers from Superfront, a retailer that is all about zhuzhing up IKEA kitchen cabinets. This added another $4,200 or so to her remodel cost. If Roberts had stuck to only IKEA products, she estimates that she could have saved roughly $2,800 and kept her grand total to about $8,300.
If you’re going all out with a full kitchen cabinet makeover, consider waiting for a sale. (Even a 10 to 15 percent savings makes a difference when you’re outfitting an entire kitchen.) “IKEA usually has a big kitchen sale event around this time every year,” says interior designer Debra Vigna, cofounder of Los Angeles–based Lily Spindle Design, who often works with IKEA kitchen cabinets for her clients. Pro tips: If you do scope a promotion, don’t wait until its final days to place your order, and avoid in-store visits on the weekend if you can.

Planning
What to keep in mind as you dive headfirst into mood boarding.
1. Start With the Software
Ordering IKEA kitchen cabinets involves more than choosing just the cabinets themselves—you’ll need to select doors, drawers, filler pieces, and more. Since your cabinet configuration will inform all the above, IKEA’s online Kitchen Planner tool is a great place to map it out.
Vigna often encounters clients looking for design flexibility in their kitchens—layouts conducive to little kids, open floor plans, mixed uses, and more. She recommends IKEA’s Kitchen Planner as a helpful starting point in determining what you want. “IKEA’s cabinet system is made to be modular, so you can move things around and play with it,” she says.
Pour yourself a glass of wine, get comfortable, and cozy in for no less than a few quality hours with the online software. After your at-home sofa session, make an in-store appointment with an IKEA kitchen specialist to dive in deeper. “The planner software may pop things in that you don’t necessarily need,” says Vigna. “You might not get the kitchen you really want if you don’t engage a pro.”
2. Visit IKEA IRL
Reserve the better part of a day for an in-person visit. Make an in-store appointment ahead of time, bring your rough layout, and plan to meet one of IKEA’s kitchen planners for a more personalized consult and product walk-through.
“Going over everything with a kitchen specialist ensures your layout is practical and workable for your space,” explains Vigna. (Think: not-so-minor details, like making sure the drawer type you’re eyeing is designed to work with your cabinet choice.)
Roberts dubs floor planning the most complicated phase of her kitchen reno process—she made not one but several trips to the retailer to review and refine her layout as it evolved. Although you book your in-store appointments in advance, “you’ll likely meet with someone different each time, and skill and experience levels differ,” says Roberts. Her back-and-forth visits paid off, though, with a kitchen configuration that maximizes Roberts’s limited square footage. “IKEA kitchen cabinets are as customizable as it gets for not being custom,” she adds.
3. Think Outside the Box
“It’s easy to fall into the trap of a very typical kitchen layout,” says Vigna. “Think about ways to create flow and personalize it, like integrating shelving for cookbooks or accommodating space for a pottery collection.”
For one kitchen remodel in North Hollywood, Vigna extended a client’s long galley kitchen into their dining area. Apt to entertain, they wanted a breakfast nook, but putting a kitchen table in the newly opened space would be redundant. Vigna cleverly turned to IKEA’s refrigerator cabinet to create a bench where her client’s guests could hang while they cooked and carried on conversations.
While fine-tuning your cabinet configuration, consider your current kitchen and the way you work in it. Ask yourself: Do I cook often and have enough space to meal prep properly? Do I have an island that adds surface area, or rely on countertops to do it all? Is my storage situation sustainable or at max capacity? Do I recycle or compost? What are my most-used appliances that require easy access, and which do I prefer to store out of sight—and where will they all go? Do I use my kitchen space for anything other than cooking and entertaining, like working from home or homeschooling? All this should help shape your kitchen cabinet setup.
4. Strategize Your Delivery
After you’ve placed your IKEA kitchen cabinets order, make a game plan for where and how you’ll store its components until you’re ready to install. IKEA confirms a specific delivery date to plan around, although there’s a chance not all the pieces you order will arrive in one shipment. More important, if you opt to add custom fronts from another retailer, such as Semihandmade, be sure to sync both order arrivals to avoid major box pileup for weeks on end. (Vigna warns that Semihandmade ensures only a delivery window rather than a hard-and-fast date, but you’ll be glad you coordinated the timing as much as possible.)


Installation
To DIY or not to DIY, that is the question.
Aside from budget-friendly prices, the beauty of everyone’s favorite flat-pack retailer is that theoretically, yes, you can assemble its products yourself. Doing so without exerting a day’s worth of blood, sweat, and tears is another story. It’s no secret that IKEA assembly is usually a headache in a box. (IKEA bought TaskRabbit in 2018—evidence the company recognizes the problem.)
When it comes to assembling and installing IKEA kitchen cabinets, the general consensus is: If you consider yourself a handy person and can carry a toolbox with the best of ’em, go for it and more power (tools) to you! If not, chalk up an installation service cost as money well spent—and grief well saved. “It’s definitely tricky,” says Vigna, who recommends working with an installer. Having an expert who can respond in real time to unexpected roadblocks is valuable. “Someone with good carpentry skills gives you more options than you’d think,” she notes.
“Hiring an installer may add another 5 to 8 percent cost to your project bottom line,” continues Vigna. “But when 50 IKEA boxes arrive and you don’t know what they are or where they go, it’s such a lifesaver to have someone come in and put it all together in a day.” Be sure to share your design sketch with the installer to understand the big picture before getting started.
Or keep it all in the family. For her townhouse, Roberts used IKEA’s in-house Kitchen Installation Service to install her cabinet frames and appliances and Superfront customizers. “The level of workmanship was very good, with high attention to detail,” says Roberts. “It took more than a week to install, but I was really impressed.”

Customization
How to get bespoke on a budget.
Each IKEA kitchen cabinet collection is offered in a handful of finishes and colors. While curated options streamline decision-making, the limited expressions can feel a bit cookie-cutter-ish, depending on your kitchen layout. Fortunately all IKEA kitchen cabinets are frameless, Vigna explains, meaning drawers and door fronts cover the entire front of the cabinets—making it easy to (almost literally) tack on your personal style.
Design companies like Semihandmade and Superfront cropped up to fill that void. “Many of my clients move into blank-slate kitchens that don’t have a lot of inherent personality,” says Vigna. “After you’ve just invested in a new home, going with IKEA kitchen cabinets and a company like Semihandmade allows you to get an upscale look and a lot of functionality.”
Spotlight on Semihandmade
Designed for IKEA’s Sektion system, Semihandmade’s fronts occupy many of your favorite design stars’ kitchens. “They make quality doors and drawer fronts to create the look of a custom kitchen for less,” says designer Sarah Sherman Samuel, who has an Insta-worthy collab with the brand. Choose from vibrant wood veneers or DIY paintable fronts for a more playful option.
“Semihandmade’s veneer line is really high-quality and looks very realistic,” says Vigna. The best part: “Since it’s not actually wood, you don’t have to worry about damage or water stains.” Before you place your order, you can email the Semihandmade team your IKEA kitchen cabinet configuration from the Kitchen Planner tool, so they can review it and help build your shopping cart.
Spotlight on Superfront
With options like fish scales, stripes, and geometric shapes, Superfront is all about prints and texture but also offers a range of playful colors for smooth fronts. Roberts chose the latter for her kitchen remodel in Superfront’s pale Grannie Pink. “The kitchen is becoming more than just a functional space where you cook,” says Roberts. “People are putting their stamp on it, so don’t be afraid to be different and go with what you love.”
Similar to Semihandmade, Superfront will review your IKEA kitchen cabinet layout and, for a small fee, help refine your design plans and put your order together. “Having the Superfront team oversee my order really took the stress away,” says Roberts. “They made sure all my fillers and plinths were accounted for, so I knew I’d have the pieces I needed when my order arrived.”
Semihandmade and Superfront aren’t the only two brands aimed at dressing up IKEA’s pared-back kitchen flat-packs. There are several companies out there making custom cupboards look easy—Plykea, Kokeena, Reform, and Husk to name a few. You can choose one that best complements your IKEA kitchen system, budget, and taste.

Common Mistakes
Spare yourself some headaches with these stress-saving tips.
1. Measure to a T
As in, measure everything. “You’re doing your own measurements and ordering based on those measurements,” says Vigna. “That’s maybe the scariest part.” Avoid an install-day disaster by having the math on your side—down to every last inch.
Take a cue from what Copenhagen-based blogger Sofie Amalie Rolandsen of Thus the Fuss learned the hard way. When designing her cabinet layout in IKEA’s Kitchen Planner, she didn’t account for the extra-large sink that would be welded into her custom stainless steel countertop. When it came time for the carpenter to assemble the cupboard frames, they realized the drawer underneath the sink was too high and had to sand down the top to make it work.
Vigna recommends taking measurements from wall to wall, accounting for the placement and dimensions of doorframes, windows, radiators, light switches, power outlets, sewage and water pipes, and the clearance around ceiling lights. Can any of the above be adjusted? Note that, too. When measuring wall lengths and corners, take measurements at the back, middle, and front points. “Walls are never straight and corners are never square,” she says. “So no detail is too small.” IKEA kitchen cabinets have fixed dimensions, so if you’re cutting it close, err on the side of a smaller cabinet and put in a spacer piece.
2. Dot the i’s
The devil is in the details, so don’t overlook the nitty-gritty like hinges, cross-brand alignment, and cabinet edges. “We did mess up and get the wrong hinges,” says Samuel. “Pro tip: IKEA actually has two different kinds for its cabinets, so be sure to read the fine print to know which ones you need!”
If you’re using both IKEA drawer or door fronts and a custom option from an outside retailer, be sure to double-check the small-print dimensions to confirm they line up. “For example, Semihandmade offers a three-quarter-inch door depth, and IKEA has a half-inch depth,” says Vigna. “If you configure them side by side on the same IKEA kitchen cabinet frames, they won’t be flush.”
Finally, think about those last touches. Vigna recommends finishing your edges for a more polished, upscale look. “It looks so much more professional if you clad all the sides of your cabinets and put cover panels on the tops, sides, and bottoms,” she says.
3. Be Honest About Your DIY IQ
This isn’t the time to tap into your undiscovered handyman. Leave the install to the pros if you need to. Rolandsen’s main advice from all her IKEA lessons learned? Have someone who knows how to install an IKEA kitchen install your IKEA kitchen. Rolandsen and her boyfriend passed their plans off to a local carpenter not well versed in building the retailer’s designs. “We had to make some last-minute fixes because the guy took the task a little too lightly,” she recalls.

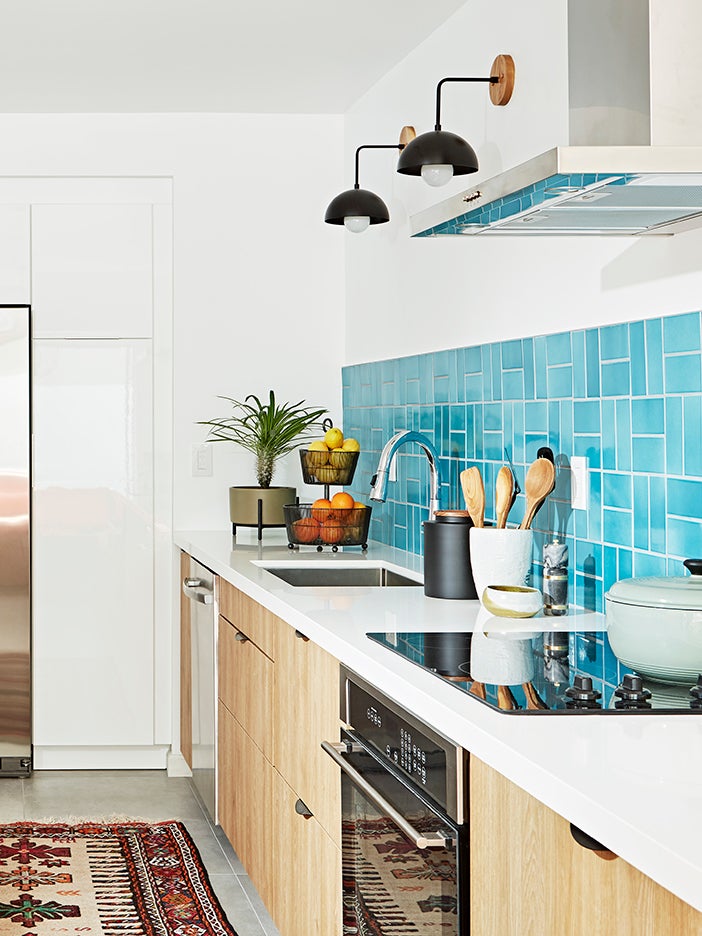
Inspiration
Ready to get started? Trust your gut along the way. (This is the kitchen, after all.)

“One thing I really kept in mind was color-blocking, or, more accurately, neutral-blocking,” says Samuel of her recent kitchen install. A wall-length bank of inky black countertops, cabinets, and appliances pop against a chalky backsplash and range hood. “The room started to really come together once we installed the cabinets,” she says. “Seeing it go from empty IKEA boxes to adding on our Semihandmade fronts…it was like, bam, instant kitchen!”

When Rolandsen’s dream of a custom solid-wood kitchen proved too costly, she pivoted. She ordered IKEA kitchen cabinet frames and added custom wood door fronts with a luxe-looking grain. Her compromise paid off in the end when the project totaled around $8,300.

In Jessica and Tyler Marés’s Los Angeles kitchen, the cabinets and thick oak veneer countertops were IKEA scores. “I’m a big fan of IKEA butcher block,” says Jessica. “It’s an easy way to get an affordable, finished top that you can install and cut yourself.” As they had already purchased new cabinet frames from IKEA, the couple tacked on two slabs of wood to their order for around $350. The retailer’s cupboards come with holes for screws, so the Maréses just had to secure the countertop and caulk the seams.

Interior designer and Souda studio manager Alex Fawcett went with matte black IKEA cabinets when renovating this mid-century kitchen that saw its last update in the late ’70s. Fawcett kept the sink and plumbing in their original places to minimize costs, making the cabinet configuration super-straightforward.

First-time homeowners Carly and Justin Wilczynski turned to IKEA kitchen cabinets when making over the awkward L-shaped kitchen in their Pasadena, California, fixer-upper. The couple chose Semihandmade beadboard doors and brass pulls from Schoolhouse to elevate the fronts. One perk of opting for IKEA? Storage is seamless. “Everything I buy from the store, like lid holders, trash cans, and utensil organizers, are made perfectly to go in there,” notes Carly.
Our Winter Renovation issue is here! Subscribe now to step inside Leanne Ford’s latest project—her own historic Pennsylvania home. Plus discover our new rules of reno.