How to Rewire a Lamp, Because That Epic Vintage Find Is Worth Fixing
Grab a cord kit.
Published Feb 2, 2022 1:00 AM

We may earn revenue from the products available on this page and participate in affiliate programs.

Few feelings compare to the giddiness of purchasing a stellar vintage table lamp online, aside from the disappointment of receiving it and realizing its wiring is a wee bit wonky. Anika Gandhi, electrical engineer–turned–DIY expert at Anika’s DIY Life, and Domino’s style director, Naomi deManana, assure us that replacing the cord isn’t as scary as it sounds. Instead of cursing the home decor gods, focus on overcoming the one simple obstacle standing between you and a light that functions properly: figuring out how to rewire a lamp.
What Are the Main Parts of a Table Lamp?

From top to bottom:
- The harp, a horseshoe-shaped piece of metal attached to the lamp base socket.
- The socket shell, a protective home for the socket. Within it, you’ll find the insulation sleeve, which shields the lamp body from heat and electricity, and the socket itself, which houses the socket terminals and lamp switch.
- The cap, sometimes made of brass and held together with a screw. It provides electricity and keeps the base securely in place.
- The switch, which connects to the socket base and turns the lamp on and off.
- The neutral and hot wires, which fit around the socket’s screw terminals.
Common Lamp Rewiring Mistakes to Avoid
Mixing Up Your Wires
Did you throw caution to the wind and haphazardly pair the neutral and hot wires? “The way the lamp is set up is that the hot [wire] is on the inside and the neutrals on the outside,” says Gandhi. “So if you switch them, you might touch it and get a shock.”
Overlooking Damaged Insulation
If the insulation sheath inside the socket holder is torn or you accidentally shift it out of place, the results could be electrifying—but not in a good way. “That’s basically the insulation between the inside and outside of the lamp to ensure you don’t get an electric shock,” says Gandhi. “It has to be there, because if it’s not, then the outside of the body of the lamp will electrocute you.”
Testing the Lamp Before It’s Fully Reassembled
If you’ve made it this far without abandoning ship for a new, fully functional light, it’s probably tempting to check your handiwork as soon as you finish the first few steps. But this is a major no-no, warns Gandhi. To avoid—you guessed it—getting shocked, make sure you completely reassemble the lamp before trying it out.
Damaging the Socket Shell and Cap
Oftentimes the lamp’s original socket can be reused, so unless you plan on replacing these components, handle them gently during the removal process and keep them in a safe spot.
Purchasing a Wire With Plastic Cover
Wires with the standard plastic sheath tend to wear out quicker, so deManana suggests choosing a fabric-wrapped alternative. To add a bit of style, purchase an option that blends with your wall paint.
How to Rewire a Lamp
The Supplies
- Screwdriver
- Pliers
- Wire stripper/cutter combo
- New lamp cord (optional, prestripped)
- Electrical tape (optional)
Step 1: Unplug the Lamp
Listen, a Captain Obvious recommendation never hurt anyone. Before you do anything else, make sure you unplug the lamp to ensure that it’s the only thing getting wired during this process.
Step 2: Remove the Bulb, Base Cover, and Socket
Remove the lamp shade. Make sure the bulb is cool enough to handle, then twist the bulb counterclockwise until it detaches from the socket. Set it aside.

Metal sockets typically have a “Press” inscription on the side of the actual shell, which indicates where you should apply pressure to separate the socket shell from the cap. Or use a screwdriver to pry the socket shell and cardboard insulation sleeve loose from the cap. Set socket aside.

Simply unscrew the base of the lamp. If the cap screw is rusted, deManana recommends using pliers to remove it. Set the base next to the bulb (deManana suggests keeping the parts in the same order as they are on the light for easy reassembly).

Remove the cover on the underside of your lamp base. Unscrew the screws securing the wire to the socket shell, and pull the cord you plan to replace out through the pipe and the bottom of the light fixture. Then snake the new wire back up through the body of the lamp.
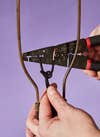
Next, use your fingers or the wire cutter to separate the woven cord, using the seam down the middle as your guide. Pull it apart until the two separate pieces are each a few inches long. Then tie them into a tight pretzel-shaped knot, as shown above. Using a 16-gauge setting on the wire stripper, remove a portion of the cord cover on the ends of the separate pieces, leaving a 1/2 to ¾ inch of exposed wire to work with.
Step 3: Identify the Hot and Neutral Wires

In many cases, the wire tips are separated by color: Black equals hot and silver equals neutral. (Or the wire tips are distinguished by feel: Smooth means the wire is hot, whereas a textured tip is neutral.) Twist the wire together right up to the bare ends so it’s easier to attach them to the screw terminals.
Step 4: Attach the Wires
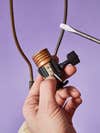
Like the wires, each of the screws on the socket is either hot (brass) or neutral (silver). Match them up with the corresponding wires accordingly. In a clockwise direction, loop the hot wire around the brass screw, then loop the neutral wire around the silver screw.
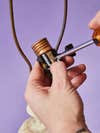
Lastly, tighten the screws with the screwdriver.
Step 5: Reassemble!
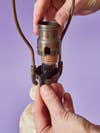
As an extra safety measure, Gandhi suggests putting electrical tape around the bottom of the socket before placing it back into the shell in order to prevent electrocution. Then reassemble the cap, socket shell, insulation sleeve, and socket. Screw in your bulb, plug in your lamp and… voilà!

Bonus: What’s Different If You’re Rewiring a Floor Lamp
Overall, there isn’t much difference other than the assembly process. For example, a floor lamp can come with a neck swivel that attaches to the socket cap. Additionally, floor lamps come with a break (a decorative piece that separates the base or allows for the lamp to be extended or retracted), which means you’ll be working with a noticeably longer cord that needs to be threaded through several pieces instead of a single tube.