how to perfectly paint your walls (advice from pro painters!)
read this before you even decide on a color.
Published May 5, 2016 5:00 AM
We may earn revenue from the products available on this page and participate in affiliate programs.
There’s no denying the easiest way to add color to your home is to grab a can of paint. After all, there are SO many different parts of your home you can paint. From the window frame to the ceiling, back down to the floor and everywhere in between (aka the walls, of course), your home is practically begging to be painted. But where to begin? No matter if you’re DIYing the project yourself or seeking professional help, applying paint to your walls has the tendency to feel like more of a commitment than actually signing a lease (or dare I say, buying a home). It doesn’t have to be that serious and really isn’t as scary as you think—as long as you’re armed with the correct tips and tools, which is where our experts come in. We spoke with Matthew Watson, one of TaskRabbit’s NYC-based EliteTaskers, and Emrys Berwick, one half of Berwick • Edel, a full service interior renovation company specializing in painting and finishing, to create the ultimate beginner’s guide to painting your own walls.
If you’re one of those people who continues to sing the praises of the white, minimalist wall, know you’re always welcome over on the dark side (which isn’t really dark, but probably more of a pleasant pastel).
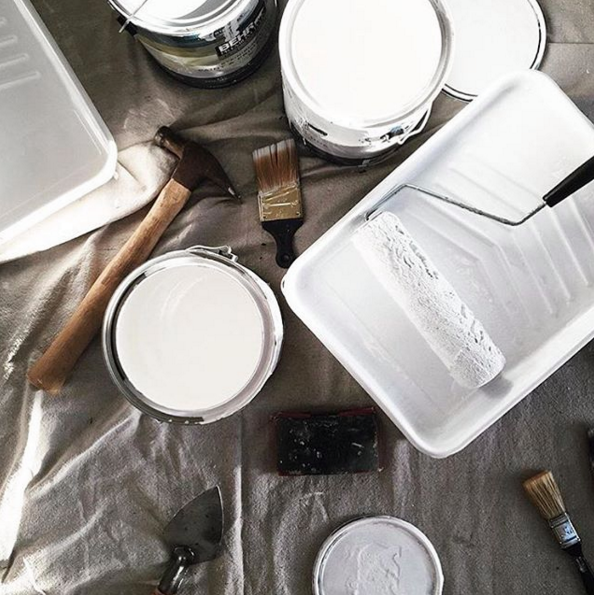
how to prep
Getting your walls ready for painting and investing in the correct materials is arguably more important than actually applying paint to your walls.
Step 1: Buy your paint and brushes.
Berwick, whose company works with homeowners, interior designers and architects on a variety of different paint projects, prefers Farrow & Ball paint. Watson on the other hand, recommends buying Benjamin Moore or Behr. They both agree that you shouldn’t skimp on price, because quality is what matters most, which includes your brushes.
Speaking of brushes, you’ll need to invest in two different types. The first being a bristle brush for painting trim or cutting in a wall, aka painting near the trim—and the tape, for beginners. Berwick recommends a 2 ½” angled brush for this purpose. Now for the rollers. Buying two is preferable, one mini (three to five inches) and one regular-sized (nine inches).
Step 2: Cover and move your furniture.
This is all personal preference. Moving your furniture to the center of the room and covering with a drop cloth—paper, plastic, or actual cloth—will suffice. If you’re painting a smaller room or just have the feeling you’ll want all your stuff out of there, move it out. Know you’re a messy painter? Cover. Your. Tracks.
Step 3: Repair imperfections.
Not prepping your walls properly is a rookie mistake. Filling all holes (making sure to sand when you’re done!) is necessary. What’s not? Sanding your entire wall. Cue you sighing a breath of relief. Sanding helps smooth out inconsistencies or imperfections, which hopefully is NOT your whole wall, but just a few tiny areas.
Step 4: Clean your walls.
Watson and Berwick agree, you need to wipe down the surface you plan on painting with a damp cloth. This cleans (duh) the wall and removes any dust from sanding or general grime that you don’t want living under your new paint job.
a lesson in primer
We all know what primer does. It primes your surface for paint… which means… okay, we admit it. Prior to speaking with our knowledgeable experts, all we really knew was that primer helps you get the correct color you see on the can. But how and why? That was a mystery.
According to Berwick, “Primer’s purpose is to secure a raw substrate; wood, sheetrock, plaster, etc., so that a finish paint will bond to it. It’s also necessary to prime if you’re doing a drastic color change.”
Watson said we even need it when painting a white wall, which has our inner lazy-girl screaming in protest. But we’re the ones who asked for expert advice, so it’s safe to say we’re going to take it.
So now that we’ve established you must use a primer—no matter what, even when painting white walls—it’s important to understand why. As Berwick said, it helps the paint “stick” and look the intended color, but it will also help you get the full square footage out of your paint. That means if for some reason you opt out of using a primer, the paint you buy for a certain area of your home might not actually be enough, though that’s what the can promised.
Moral of the story: Buy yourself some primer.
to tape, or not to tape?
Are you a beginner? Tape it, for sure. The pros have perfected their freehand “cut”, but the rest of us are too prone to mistakes. Feeling unskilled? It’s about to get worse. Taping in straight lines is similarly difficult to painting in a straight line. Womp, womp. This means you should tape, but also pretend like you’re freehanding.
Berwick offered the old adage, “Practice and patience makes perfect.” So don’t get discouraged. Also, try to have a little fun.
Watson says he uses tape when he’s painting a room with “pristine, new construction with good edging,” while Berwick says if you’re painting a dark wall against a light trim, always grab for the tape to get the cleanest line. He also warns that you should always tape your baseboard (the moulding near the floor) in case of splatter.
While we’re on the topic of clean trim, we might as well discuss mistakes. We all make them, but when it comes to your pretty white ceiling or moulding, they’re not cool. Not cool at all. Remember that damp rag you cleaned your walls with before embarking on your project? Keep it handy—like on your person handy—to immediately wipe away mistakes.
it’s time to put the paint on the walls
Let’s begin with strategy. According to Berwick, you should always work from top to bottom, which is thankfully, how most of us naturally attack a wall with paint. Ideally, you’ll have a two-person paint team—aka it’s time to enlist a friend or roommate. One of you will cut in, or paint the straightest line possible at the top of your wall, while the other paints down the wall filling in your “outline”. The name of the game is never letting a “hard line” dry, which means your straight, bristle-drawn outline needs to be joined with your partner’s roller paint contributions ASAP. Berwick explained it as painting “wet to wet”, meaning the wet outline painted by person #1 is always met with wet roller paint from person #2. Once you let hard lines dry, there’s no fixing them—painting even coats over simply darkens dried lines.
Now that you understand how to tag team your walls, we can move on to more specifics, like how much paint to pick up with your brushes. Both experts agree, you should pick up as much paint as you can.
Berwick said of using a bristle brush, “I get a lot of paint on my brush and get it on the wall quickly, then spread it around a bit till I get the perfect amount on the tip of my brush to cut in all while evenly spreading it out.”
Watson said, “With a new roller, you want to roll it a bunch of times in the paint.”
Twenty-five to one hundred times (!!) should be about right. He noted you should stop just before the roller is soaking and starts to drip.
So you’ve got your strategy and some paint on your brush, what can you do to get an even color? First, don’t even think of painting just one coat. You’ll always need two for a consistent color.
Watson said, “Rollers inherently won’t cover every single part of the wall the first time, so it’s always a good idea to go over a second time to ensure an even coat.”
Speaking of even, you’re probably wondering how the brush strokes differ between the roller and the bristle brush. Okay, so maybe your mind didn’t naturally travel to that question, but the answer is noticeably. Berwick advises using a mini roller over your cut in to give the wall a uniform appearance.
Once you’ve got your paint on the walls (congrats!), make sure to allow enough dry time between your first and second coats. Though the paint will be try to the touch after around an hour, Berwick advises waiting four hours between coats for water-based products, which is what most paint companies recommend.
After you’ve successfully painted two, even coats of paint and let it dry, you’re done.
parting words of wisdom
“Uniformity is one of the keys to a good paint job,” said Berwick.
“It’s going to take more time than you expect, always. Also, have fun with it!” said Watson.
So there you have it. The beginner’s guide to painting your walls! We would say good luck, but armed with all of this expert advice, you don’t even need it.