DIY a Beaded Chandelier for Less Than $50
Turn a hanging basket into a low-cost, high-impact light fixture.
Published Sep 24, 2017 10:00 AM
We may earn revenue from the products available on this page and participate in affiliate programs.
Annette Vartanian is the creator of A Vintage Splendor, a vintage modern lifestyle blog covering fashion, interiors, entertaining, and more. She also offer vintage shopping tours, vintage styling services, and a bevy of how-tos and DIYs. Check out her home tour here.
Lighting is arguably the most essential element of a home’s decor. Beyond serving a practical purpose, it sets the mood, helps define the style, and can make a bold statement.
I’ve tried desk lamps before and they just don’t cast the type of soft light I need in my work space, so I decided to go with a chandelier. I spent hours searching for the perfect piece, but everything was way over budget (costing more than my computer), or they fell flat in design.
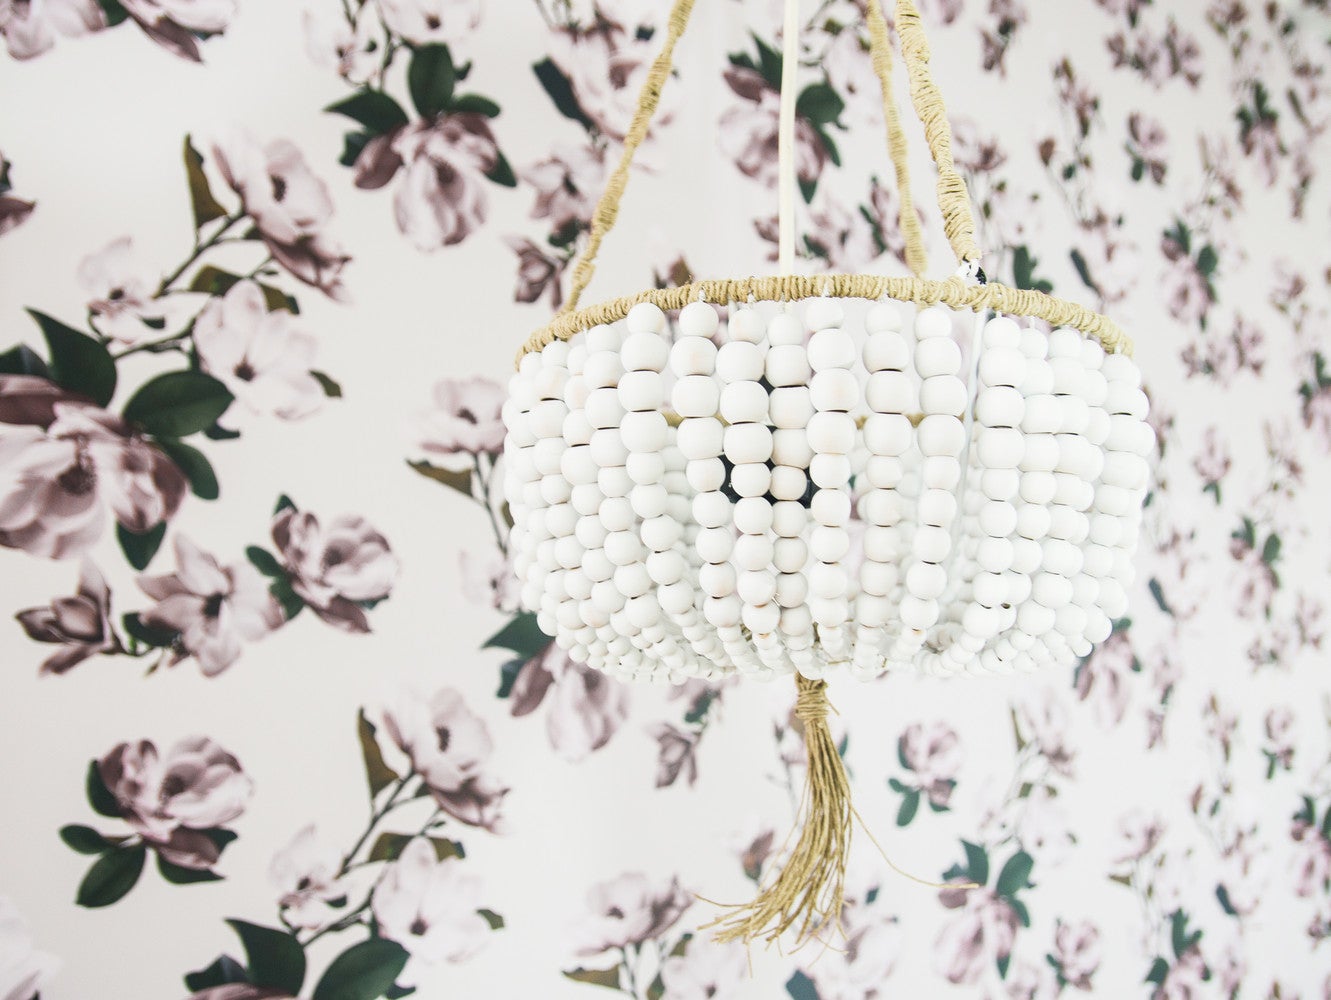
The solution? I pulled together some items I found at the flea market and make my own chandelier. The hemp twine and basket were flea market finds (for under $4), I found the wood beads online for about $30 (Amazon and Michael’s are both good sources), and the hanging pendant light was from an old Ikea fixture.
All together, this is a low cost, high impact chandelier project—but the beading and dry time does make it rather time consuming. It took me two full evenings, and several episodes of Gilmore Girls to complete.
Supplies:
- 1 hanging basket
- White spray paint
- Scissors
- Approximately 400 8MM wood beads
- Approximately 300 12MM wood beads
- Approximately 200 16MM wood beads
- Hemp twine
- Hanging pendant light (this $15 one from Home Depot would work well)
1. Start by choosing a design for your strands of beads. For my design, I started with one 16MM bead, three 12MM beads, five 16MM beads, and ten 8MM beads. Measure out and cut string (for this pattern, it’s about 14” of string). Tie a knot on one end and string your beads leaving enough room on either end.
Repeat, repeat, repeat… I had approximately 40 strands. Note: You don’t have to use wooden beads—beads come in an endless range of shapes, colors, and textures.
2. Spray paint your basket. I chose white as my base, but you could easily go bold with color. Once the basket is completely dry, begin attaching the strands to your basket.
I found it easier to tie at the top and then leave just enough slack when tying at the bottom. Trim excess string with scissors.
3. Spray paint your beaded basket and beads and allow to dry.
4. Next, wrap the top wire with the hemp twine twice. Wrapping a second time will cover up any knots and help secure the strands. You’ll also need to wrap the chain (this only requires one wrap).
5. For added flair, I made a tassel with the hemp twine and tied it to the bottom of the basket.
6. Hang the wire basket, and run a pendant hanging light through the center.
See more stylish DIYs:
How to DIY a French Tufted Mattress DIY Woven Wall Hangings to add ‘70s flair to your space DIY Projects You’ll Actually Use IRL