This DIYer’s Dream Nightstand Cost $3,400, So She Hacked an IKEA One for $115
Bonus: The project has a meditative effect.
Updated Oct 12, 2018 10:38 AM

We may earn revenue from the products available on this page and participate in affiliate programs.
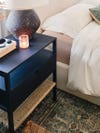
Lita Lee had found her dream nightstands. The stained oak pieces from Amber Interior Design featured custom carved drawer pulls and rope cord shelves, plus they were the perfect size for her king bed. The only problem was each cost a cool $3,400. Fortunately Lee is seasoned in the art of DIY: She picked up two Nordkisa nightstands from IKEA (the pieces cost $100 each and measure almost 2 feet wide). Most important, she could remove the solid bottom shelves and weave her own creation. “It’s something anyone could do over a weekend,” she says. It only cost an additional $15 to reimagine one of the Swedish retailer’s plain bamboo pieces. The real price was Lee’s time (it took around five hours to transform each one). Throw on a good podcast and get lost in the rhythm of the process. Ahead, Lee walks us through the steps for making over one nightstand.
The Supplies
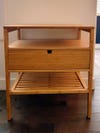
- Nordiska nightstand
- Hemp cord
- A jigsaw or hand saw
- Scissors
- Two cans of black spray paint
- Black finishing wax
- Sandpaper
Step 1: Clear the Way
After assembling the nightstands per the instructions in the box, remove the bottom shelf with a jig (a small handled saw with a slender blade).
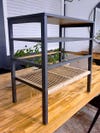
Step 2: Give It a Fresh Coat
Ensure a smooth surface for the paint to adhere to by going over the furniture with a medium-grit sandpaper. Then apply the paint (Lee went through two cans of Behr’s Classic Noir chalk spray paint). Let it dry overnight before going back over the nightstand with a wax sealer.
Step 3: Weave the Vertical
Pull a generous amount of hemp string from the roll and cut it. Tie a knot around one of the edges and begin to wrap the cord across the frame, moving from the front to the back. “Ensure the strings sit nicely against each other but never overlap,” says Lee.
Once you’ve completed five or so columns, wrap the cord three times around the front edge only. This will create a space in the pattern. (Note: You can make your gaps as wide as you like.) Then take the string across to the other side of the frame, just as you did before, and wrap it three times around the back border but in the opposite direction. This ensures that the cords are always in line with one another. Alternate between the columns and spaces until you have reached the edge of the nightstand.
Step 4: Weave the Horizontal
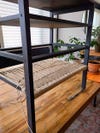
Pull a generous amount of hemp string from the roll and cut it. Tie a knot around one of the edges. Keep this pattern simple by weaving over one vertical string, then under the next, and so on. Once you find that your pattern is nearing the last third, tie off your cord and, using your fingers, pull the strings slightly apart and adjust them evenly so they cover the entire surface. “It saves you from weaving the rest of the way,” says Lee. Of course, the biggest save was her budget—now she can really sleep easy.
Our Winter Renovation issue is here! Subscribe now to step inside Leanne Ford’s latest project—her own historic Pennsylvania home. Plus discover our new rules of reno.